Blog Archives
To Get Power, Blow Out the Candle

Fastpitch softball players sometimes struggle with how to get that extra burst of power at the moment it matters the most. Whether it’s whipping the arm into release for pitchers, or accelerating the bat before contact for hitters, or some other skill requiring a ballistic final movement, instead of looking powerful they look anemic.
One of the biggest reasons for this, of course, is the fear of failure. Pitchers focused only on throwing strikes or not walking anyone will slow down when they should be speeding up.
Hitters focused on not striking out or just making contact will do the same. Catchers focused on throwing to the base rather than doing all they can to get the runner out will do it, and so on.
You can try telling them they need to be more energetic in their movements, but while they will nod their heads they will often not really understand what you mean. So here’s a quick way to explain what you’re going for.
Ask them “how do you blow out a candle?” If they give you a blank stare offer them two options: do you do it with a gentle letting out of air, like you’re trying to cool a spoonful of hot soup, or in one quick burst.

Since they’ve probably been blowing out birthday candles since the age of two or three they will tell you in one quick burst. Then ask them why they do it that way. (You can even have them demonstrate both to you, which will force them to demonstrate the principle to themselves.)
They will tell you because without the burst nothing much happens. The flame may dance a little with a reverse sip of air, but it won’t go out.
You can then explain that’s what power does. That one quick burst concentrates the air so it has an effect on the candle.
It’s the same with that final, critical movement in softball. Without that one quick, focused final burst of energy you can’t throw hard or hit hard.
While it may seem obvious to you, you’d be surprised at what isn’t so obvious to your players. Even experienced ones sometimes.

The focus on not failing, usually based on someone else’s description of what failure is, rather than succeeding or excelling, As long as they’re in that mindset it will cause them to hold back from becoming the best versions of themselves on the field.
Use the candle analogy to help them understand the importance of getting that final, powerful concentration of energy and you just may help them unleash the larger beast within them.
Birthday party photo by Alexander Mass on Pexels.com
Champions Take Their Warm-ups Seriously

You see it before a game or practice everywhere there’s a ballfield.
Teams positioned in two opposing lines, randomly throwing balls in the general direction of the other line. And then chasing said balls behind them.
Hitters casually knocking balls off tees into the bottom of nets – or over the top. Pitchers sleepwalking through a reps of a K drill or slowly strolling through a walk-through instead of going full speed.
Not just youngling rec teams either. The same behavior can be seen with high school teams, travel ball teams, even college teams.
It’s players sleepwalking through warmups as if they are something to be (barely) tolerated before the “real thing” begins.
That’s unfortunate on many levels, but mostly for what it says about those players’ dedication and desire to play like champions.
You see, champions realize that we are a product of our habits. They also realize the importance of paying attention to details.
Warm-up drills should be about more than just getting your body moving and your muscles loose. They should also be preparing you to play or practice at your highest level.
So if you’re just going through the motions, waiting for practice or the game to start, you’re missing a real opportunity to get better.
Take that hitter who is basically just knocking balls off the tee before a game. Hopefully she knows what she needs to do to hit to her full potential, and what she needs to work on to get there.
So if she’s just taking any old swing to satisfy the requirement of working at that station she could actually be making herself worse instead of better because she’s building habits (such as arm swinging, dropping her hands, or pulling her front side out) that may let her get the ball off the tee but won’t translate into powerful hits in the game.
Or take the pitcher who is sleepwalking through her K drills instead of using that time to focus on whether her arm slot is correct, she is leading her elbow through the back half of the circle, and she is allowing her forearm to whip and pronate into release. She shouldn’t be surprised if her speed is down, her accuracy is off, and her movement pitches aren’t behaving as they should when she goes into a full pitch.
Even the throwing drills that often come right after stretching require more than a half-hearted effort. Consider this: as we have discussed before, 80% of all errors are throwing errors.
Which means if your team can throw better, you can eliminate the source of 8 out of 10 errors. Cutting your errors down from 10 to 2 ought to help you win a few more ballgames, wouldn’t you think? That’s just math.

Yet how many times have you seen initial throwing warmups look more like two firing squads with the worst aim ever lined up opposite of each other?
That would be a great time to be working on throwing mechanics instead of just sharing gossip. Not that there’s anything wrong with talking while you throw. But you have to be able to keep yourself focused on your movements while you chat.
Even stretching needs to be taken seriously if it’s going to help players get ready to play and avoid injury. How many times have you seen players who are supposed to be stretching their hamstrings by kicking their legs straight out and up as high as they can go take three or four steps, raise their legs about hip-high, take another three or four steps, then do the same with the other leg.
Every step should result in a leg raise, not every fourth step. And if young softball players can’t raise their feet any higher than their hips they have some major work to do on their overall conditioning.
Because that’s just pathetic. Maybe less screen time and more time spent moving their bodies would give them more flexibility than a typical 50 year old.

The bottom line is many players seem to think warm-ups are something you do BEFORE you practice or play. But that’s wrong.
Warm-ups are actually a very important part of preparing players to play at the highest level and should be treated as such. If you don’t believe it, just watch any champion warm up.
6 Tips for Easing Back Into Softball Mode

Yesterday I had the opportunity to join in on an NFCAonline mentoring session. While several of the topics that came up were more oriented toward college programs, there was one in particular that was pretty universal: how to get players back into softball mode.
For many, these past three months may have been the longest layoff they’ve had from a formal practice/workout routine since they were pre-teens. That’s especially true for players above the Mason-Dixon line (not to be confused with the Mendoza line, which is a whole different issue), where the weather has been spotty at best, and sometimes downright uncooperative.
With not just indoor facilities but many parks closed, it’s likely many players have spent far more time than they would have otherwise making Tik Tok videos, streaming movies and TV shows, sleeping, eating junk food and doing whatever else is popular among young people these days.
I get that, too. It’s tough to get motivated when you don’t know whether your next game will be next month, next fall, or next year.
Sure, teams have been doing Zoom meetings to try to hang together, and various activities such as the Facebook videos where it looks like they’re throwing the ball from one player to the next. But none of that requires a whole lot of physical exertion or delivers much preparation to get out and play.
Now that summer leagues and travel ball is beginning to open up again, however, it’s important to ensure players who have been idle for the last few months are given the opportunity to ease their way back into playing. Otherwise there is a risk of even more time off due to injuries.
Here are six tips to help ensure players stay healthy as they start working to shake off the rust.
- Limit overhand throwing for the first few weeks. Arm and shoulder injuries due to improper throwing mechanics were already a problem, even before the Great Layoff. It’s unlikely the underlying issues have magically gotten better. While the time off was good for healing old injuries, it also means players can be highly prone to new ones. That’s why it’s important to ease them back into throwing overhand. Pay even closer attention to throwing mechanics during warmups, and spend a little more time than normal on shorter, lighter throws. (If you don’t know what to look for in terms of mechanics, check out Austin Wasserman’s excellent High Level Throwing programs.) During fielding drills, save arms by having players toss the ball to the side or drop it in a bucket at times rather than throwing the ball to a base. When you do start having players throw full-out, set a limit and stick to it. This is especially true for catchers practicing throwdowns. Remember it’s been a while. Do maybe 10-12 at most to start, and work your way up from there.
- Put more emphasis on stretching. I shouldn’t have to say this but I’m going to anyway. Players who have been largely inactive for the last couple of months likely have tight muscles. Even those who have been putting in some practice time on their own are probably not as limber as they were when they were more active with school, other sports and activities or anything that required more effort than shifting positions on the couch. They need to get those muscles, tendons and ligaments working properly again. For the first few practices be sure you plan extra time for dynamic stretches to begin practice, and watch to make sure they’re doing those stretches properly. (I can’t tell you how many times I’ve watched teams slop their way through various stretches and then expect they’re ready to play.) When you’re approaching the end of practice, be sure to leave a little time for cool-down stretches too. This is important at any time, but especially right now. Get those muscles, tendons and ligaments loosened up properly now and you’ll face far fewer injury issues down the road.
- Condition intelligently. There’s a good kind of sore, where you know you fatigued the muscles well so they can strengthen and improve, and there is a bad kind of sore where you over-worked the muscles and now it’s going to take some time to recover. Unless you are a certified strength and conditioning coach you probably aren’t sure of the where that line is. It’s going to be tempting to try to get your team into peak game shape in one or two practices. Don’t succumb to that temptation. Remember that young people can have all kinds of stuff going on beneath the surface – Osgood-Schlatter Disease, growth plates, chronic tendonitis, etc. – that can affect their performance and cause pain. Overconditioning early on can exacerbate these conditions. While there may be a desire to get them into mid-season shape right now, resist it. Ease them in and build to it, just as you would in any other season. It will pay off in the long term.
- Limit repetitions. One of the keys to all of the above is to limit repetitions in the early rounds. Overuse injuries are essentially caused by performing more repetitions than the body is capable of safely handling. After a period of inactivity that number may be a lot lower than you’re used to in a practice setting. Deal with it. There are actually two benefits to it. First, variety in activities helps work different muscle groups. That’s why so many college coaches say they like multi-sport athletes. The kids they get are in better shape and less likely to be damaged. The second benefit is that you have a lot of ground to make up. Focusing too much in any one area means other areas are being ignored, and you know those other areas will come back to bite you. Fewer reps means less time spent, which means you have time for other areas.
- Hydrate early and often. If your players have mostly been laying around doing nothing they probably aren’t going to be used to the physical exertion of stretches, much less a full-fledged practice. As a result they can dehydrate quickly. Be sure to take frequent water breaks, especially for the first couple of weeks, and keep an eye out for signs of dehydration. Better yet, let them bring their water with them from station to station or area to area. After all, it’s unlikely that 12 or 14 or whatever number of players on a team will all need the same amount of water at the same time(s).
- Remember the mental side. While the most obvious challenges will be physical, the mental side of the game will also need to be worked on if your players are going to be game-ready when it’s time to go. You may be all softball all the time, but most (if not all) of your players are not. That means they may have forgotten things you expect them to know (especially in the younger age groups), so be sure to go through those mental aspects as well. Walking through coverages, backups, special plays, rules and rule changes, etc. helps get their minds back in softball mode while saving their bodies. If players aren’t performing at the level they remember themselves being at before, they may experience stress or anxiety on top of what they’re already experiencing. Pay attention to those aspects as well, because they may not be able to compartmentalize their worries and concerns as well as you wish they would. Keep them focused, keep them positive and keep them engaged and they will bounce back to where they should be much faster.
Once you get back on the field it’s going to be tempting to just jam down the accelerator and take off right away. Resist that temptation.
If you ease into it instead, with an intelligent plan that builds on itself, you’re far more likely to find success in both the short and long term. Good luck!
Time To Take Some Time Off From Throwing

Photo by Rendy Maulana Yusup on Pexels.com
The season is over. Tryouts are over (at least for the most part.) What to do now?
Gung-ho fastpitch softball families (are there any other kind?) might be tempted to start going at it hard and heavy to get ready for fall ball and the upcoming spring season. After all, if you’re not working to get better, your opponents probably are.
But I have another idea. Take a break. Not just lighten up the workload to three days a week, but take an actual break.
Give your body a chance to rest, recover and build itself back up. Give your brain a chance to let go of whatever was happening before and get rejuvenated.
But it’s not just psychological. It’s also physical.
These days it seems like there is a secret prize for the team that plays the most games in the shortest period of time, and everyone is going for that prize. You’ll see programs bragging that their teams play 100 or even 150 games in a year (with a 12-player roster). Much of that playing time is compressed into September and October in the fall, and then April-July in the summer.
High school-age players may even have a heavier workload, because they have their school season and then their travel/summer season. Except Iowa, where high school is the summer season for whatever reason.
What all this has led to is a rash of overuse injuries. Not just for pitchers, although we are seeing more and more of it as this article points out. A pitching staff that throws 90 pitches a game (a conservative number for most) across 100 games will have thrown 9,000 pitches. Divide that by a three-person rotation and it’s roughly 3,000 pitches each.
That’s a lot of pitches – especially when you consider that typical college pitchers in one study, who have the benefit of daily weight training and conditioning run by a professional staff, threw an average of just 1,243 pitches during the season.
Now, Rachel Garcia, the NCAA D1 player of the year and winner of this year’s Women’s College World Series did throw 3,178 pitches total this season. But do you really think the 12 or 14 year olds you know are comparable in strength and conditioning to Rachel Garcia? Doubtful.
It’s not just about pitchers, however. Position players can also get overworked, especially when it comes to throwing. Even if you have great mechanics, the effort and stress placed on the shoulder throwing overhand a hundred times a day every day in practice can cause wear and tear that needs to be addressed.
Overuse injuries such as tendinitis and small tears in soft tissue can easily build up over time. They may not be bad enough to require surgery, but they can cause pain. And as the pain builds, the mechanics break down to work around the pain.
Over the course of a season things can get pretty sloppy. If you just launch right into the next season those issues aren’t going to magically get better. They’re going to get worse.
Finally there’s the mental side. If you’re working hard (as you should), it’s easy to become mentally fatigued as well. That’s not good either.
Taking a little time off – like professional players in all sports do, incidentally – can help recharge the ol’ batteries and get you ready to tackle new challenges.
So my advice to you is to walk away from the practice field (or area) for a bit and let your body heal itself. See a doctor or a physical therapist if you need to. But one way or another, give yourself a break and go do something else for a little while. You (and your body) will really be glad you did.
Product Review: The Softball Rope Trainer
It doesn’t take too much time going through Life in the Fastpitch Lane to see that I am pretty fanatical about good throwing mechanics. I definitely feel overhand throwing is one of the most under-taught skills in the game, which is a shame because it’s such a big part of the game (unless you have a pitcher who strikes out 18 hitters a game, every game).
So that’s why I was excited to receive a new (to me) product to test – The Softball ROPE Trainer by Perfect Pitch and Throw. According to the manufacturer it is designed to help softball (and baseball) players learn the proper mechanics for a powerful, strong and safe throw by unlocking the joints in the proper sequence. From their website:
“Using The ROPE Trainer allows players to work the throwing muscles in all parts of the kinetic chain. Using The ROPE Trainer optimizes the mechanics of the throwing sequence by building the muscles and joints used during the throwing process. Over time, using The ROPE Trainer will allow for better muscle memory, improved strength and endurance without the excessive stress caused by releasing the ball.”
You can read more about the theory behind it and how it helps prevent injuries here.
The basic design is fairly straightforward. It’s basically a softball with a plug system that lets you attach one or two sets of ropes. By focusing on getting the ropes to work  properly (and not smack the player on the head, legs or other body parts), The Rope Trainer helps players find the right path to slot their arms and follow-through properly.
You can add more resistance by using both sets of ropes to create more of a strength workout, although the grip will then not be the four-seam grip most players are used to. No worries, though. You’re not actually going to throw the ball anyway.
The manufacturer positions it as an upgrade over the old “towel drill,” where a player holds a small towel and goes through the throwing motion with the same goal in mind. In fact, here’s an article that tests The ROPE Trainer versus the towel drill. They tested the baseball version rather than the softball version, but I’m sure it’s the same.
One of the big differences in my eyes is that the ropes can swing around more than a towel, so the player has to be more precise in her arm and hand path to get the right results.
Ok, sounds good in theory. How did it work in practice?
The first girl I had try it was a terrific 14U catcher named Liv. She wanted to learn how to throw from her knees, so it seemed like the perfect opportunity to check it out.
One of the big issues with catchers, especially young ones, learning to throw from their knees is that they tend to only use their arms. They don’t get into a good position to use their shoulders, torsos, glutes, and other big muscles, and they have a big tendency not to follow through after throwing.
So I put on one of the sets of ropes, handed Liv the ball, and had her get into a runners on base stance. When I said “go” she reacted, getting into position and using The Rope Trainer as if she was actually making the throw.
As I said, Liv is awesome so after a couple of attempts she got the hang of getting the ropes to whip through to her left side at the end. Here’s a video of her as she’s using it:
Then we switched her to an actual ball. She immediately was able to make the throw with good juice on the ball, and with great accuracy too. Most important, she was using a strong throwing motion that will protect her arm and shoulder.
To give you an idea of how strong her throw was, this is what happened to her mom’s wedding ring after receiving a few at second then at first. Oops. 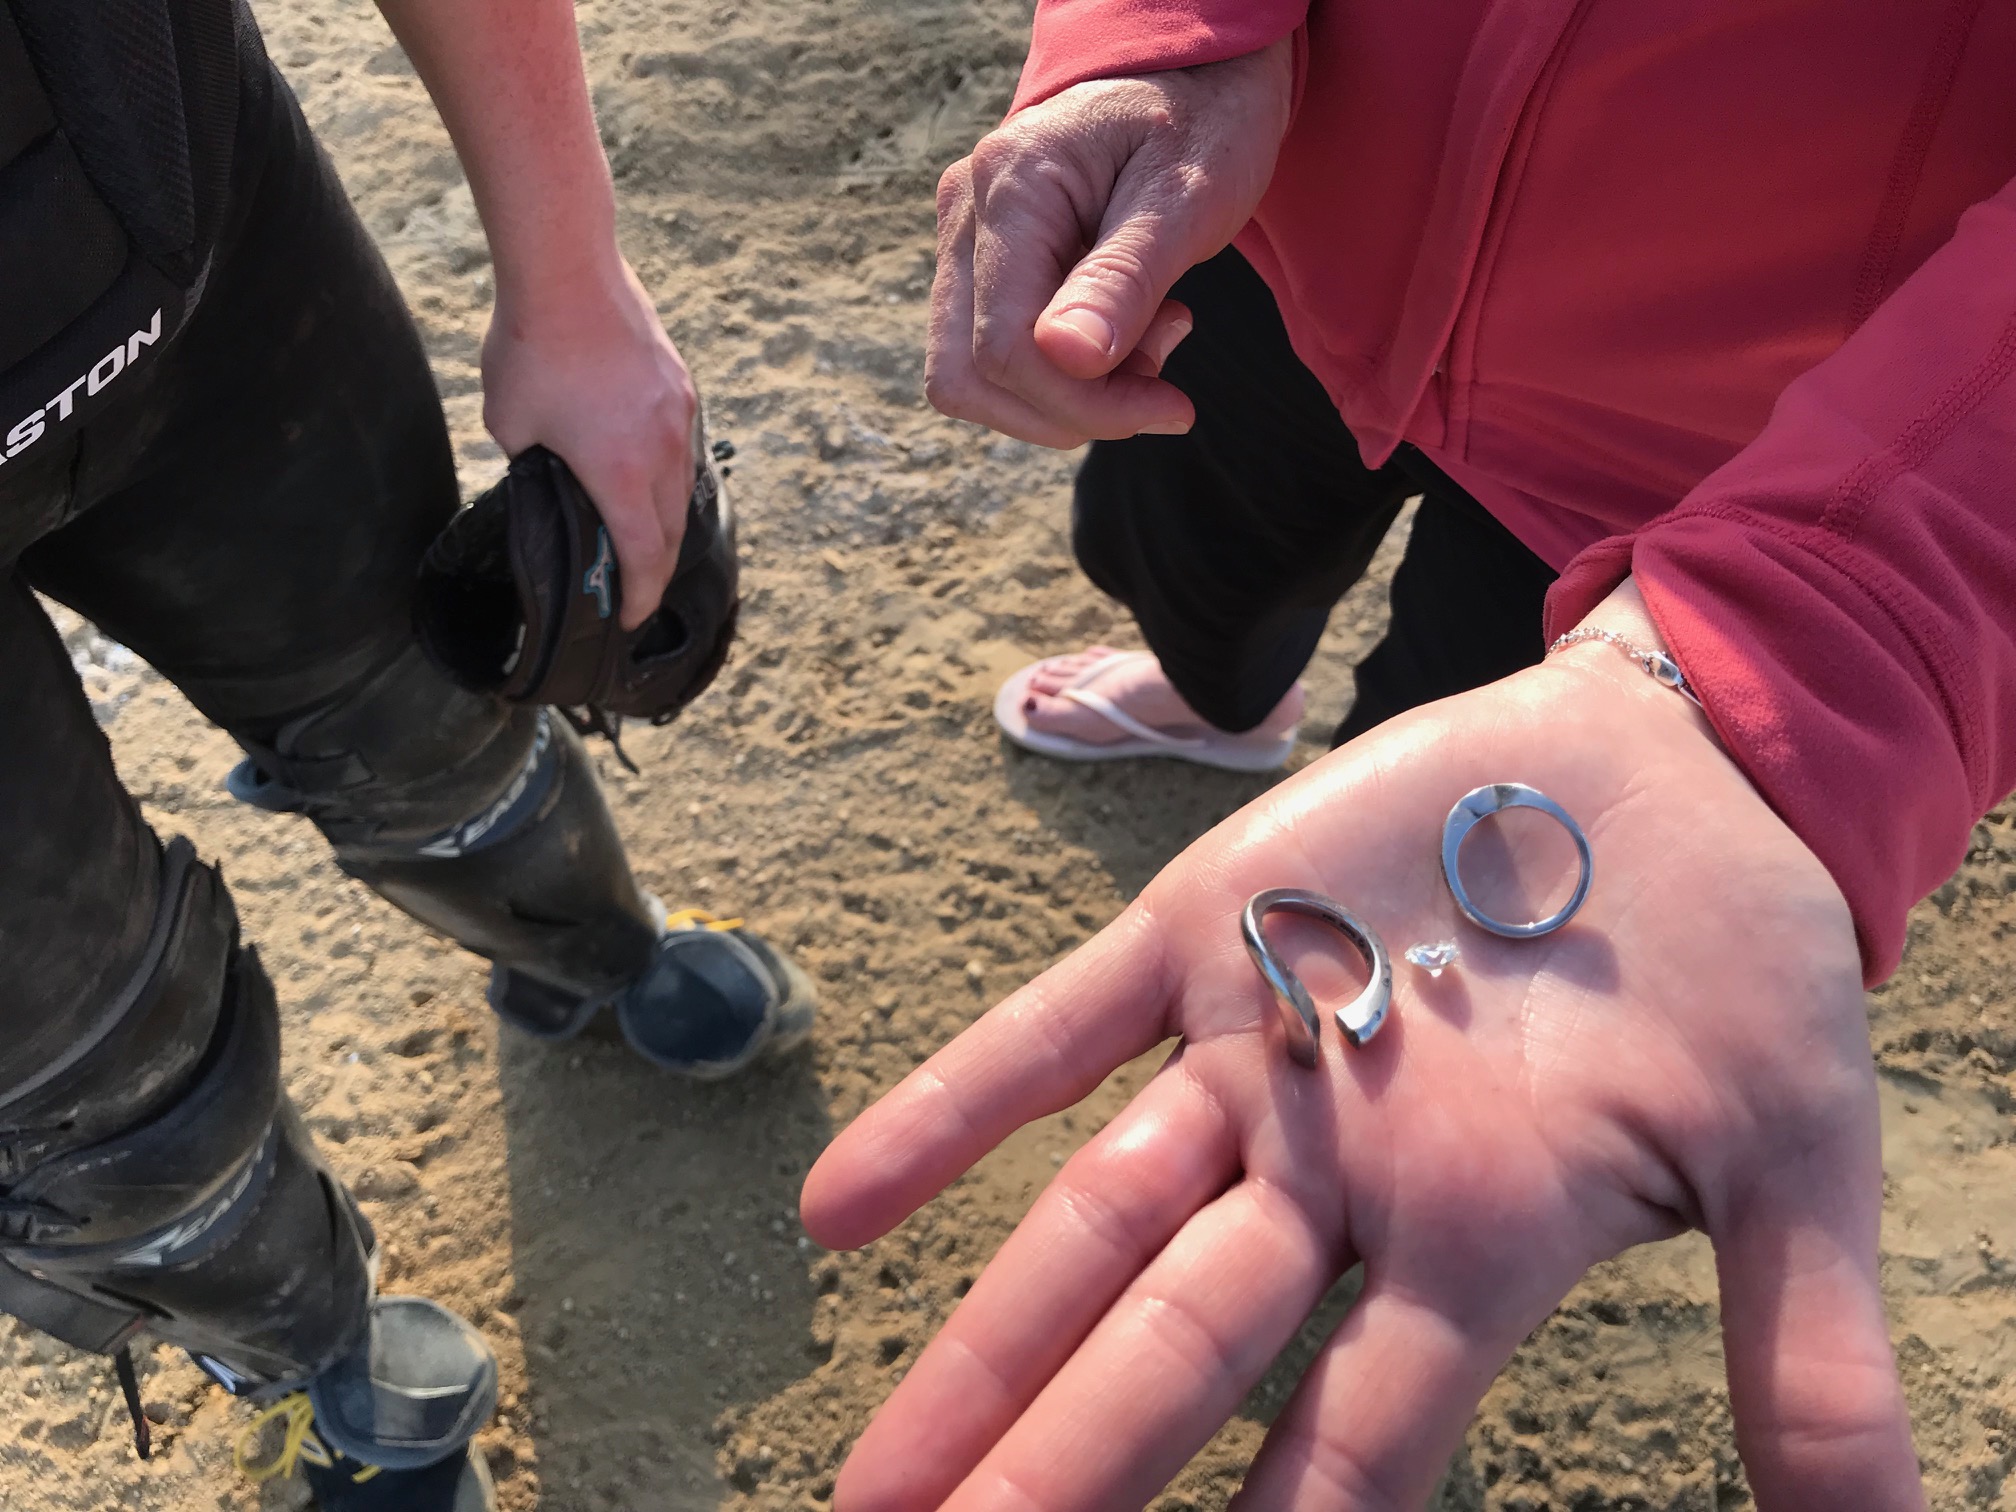
Of course, it’s easy to get something to work when you have an excellent player using it. So for another test I went the other way.
I took a younger girl (who shall remain nameless) who did not have a particularly good throwing motion and had her try The Softball ROPE Trainer as well. While the results weren’t quite as instantaneous, she also showed improvement.
This particular girl was doing the classic “throw like a girl” of dropping her elbow below her shoulder and just sort of shoving the ball forward with her arm.
(NOTE: Don’t even bother telling me how horrible I am to use the phrase “throw like a girl” and wonder how such a nasty misogynist could ever work with female athletes. I encourage my students to throw like softball players, and will put them up against any male player their age – or any dad who doesn’t think girls can throw hard. So chill.)
After working with The Softball ROPE Trainer for about five minutes she was doing better with her overhand throws. I doubt that little session was permanent, but I wanted to see if it would make a difference.
I believe it did, and that with repetition at home and/or practice someone with poor throwing mechanics could re-learn how to throw properly, most likely within 2-4 weeks with regular work.
The other nice thing about The Softball ROPE Trainer is that it doesn’t cost very much. You can purchase it direct from the manufacturer for just $67.49. I know, weird price, right?
For that money you get the ball, two rope sets (I think – the website says one but mine came with two), instructions and a nice drawstring bag to hold it all. If you wear out the ball or one of the rope sets you can purchase new ones as well, which is always nice.
If you have or know players with poor throwing mechanics, or have someone with good mechanics who want to get better, give The Softball ROPE Trainer a try.
Oh, and in case you’re wondering, I don’t know how it is for fastpitch pitching yet. That’s next on my list to try. Seems like if you have mechanics that focus on whipping the ball through the release zone instead of pushing it The Softball ROPE Trainer might work. We’ll see.
If it works, I’ll do another post on that. If not, I’ll update this one.
Overhand Throwing May Be the Most Under-Taught Skill in Fastpitch Softball
If there is one universal truth in fastpitch softball it has to be this: basic overhand throwing is the most under-taught part of the game.
It doesn’t matter if you’re watching a local high school or middle school game, a travel ball tournament, or even a college game on TV. You can almost guarantee that many of the throwing motions will be questionable, and some will be downright abysmal.
I see this all the time when I give individual lessons or conduct clinics with a group of players. The mechanics that are used to get a softball from player A to player B – which constitutes a good part of the game when a strikeout doesn’t occur – are often just awful.
So why, exactly, is that? I mean, throwing is certainly a part of every practice. It’s often one of the first things players do at practice or before a game, occurs throughout, and then is often one of the last things that happens at the end.
The only conclusion I can come to is that it’s not being taught. Throwing may be part of warm-ups, but it apparently isn’t a skill anyone thinks about working on. It’s more of a prelude to the “important stuff,” like fielding or hitting or running the bases.
That’s a huge oversight, especially when you consider the often-quoted figure that 80% of all errors are throwing errors. Which means teams could cut out 80% of their errors by learning to throw better.
Where else can you get so much payoff for paying attention to one specific area? Certainly not hitting. It’s highly unlikely you will improve your hitting by 80% no matter how much you practice. Yet teams and individuals will spend hour upon hour working on their hitting mechanics.
Throwing? Nah. Just get loosened up throwing however you feel like it and then we’ll get down to the serious work.
Just imagine, though, if teams would say hey, wait a minute. Let’s take a half hour today and try to learn to throw better. Not only would they be likely to throw harder and improve accuracy; they might also cut down on the arm injuries plaguing so many players these days.
Throwing basics
While there is obviously more to it than I can get into right now, here are a few basics of what you should see players doing when they throw – even (especially) in warm-ups.
- Stand sideways to the target with glove arms in front, hands together in front of you.
- Begin your stride, stepping the front foot so it will land at a 45 degree angle and separate the hands by pulling the elbows apart, with more emphasis in the beginning on the glove-hand elbow. The motion should be like stretching a rubber band.
- As the throwing hand goes back, turn the hand palm-down and start to make a circle. How big of a circle depends on the position and distance you will have to throw. Small circle for catchers and infielders, larger circle for outfielders.
- Land the front foot, which should be about when the glove-side elbow gets as far as it can. Then start pulling the elbow back like you’re trying to elbow someone behind you in the gut. (Be careful not to just swing it around like you’re elbowing someone in the head.)
- As the glove-side elbow begins to pulls back, rotate the hips the hips, which will help pull the shoulders in. You should feel a stretch around the stomach area if the hips are leading the shoulders properly. By now the arm should have completed the circle and be in a position to come forward.
- Continue pulling with the body, bringing the arm forward with the elbow leading, at or slightly above shoulder height.
- Drive through, allow the wrist to snap (don’t “snap” it on purpose, just keep it relaxed and allow it to happen), allow the back leg to drag up naturally, and finish with the throwing-side shoulder facing the target. That shoulder should now be lower than the glove-side shoulder.
There’s a bit more to it than that, but those seven steps should give you a pretty good start. There’s lots of good information out on the Internet that can give you more details too, although it’s important to remember to keep it simple for your players.
Teaching it purposefully
Here comes the tough part. You need to make time to work on these mechanics during practice, and they’re probably going to take a lot more time than you realize. You also need to make sure your players understand how important it is, because in our “instant-everything’ age, with its seven second attention span, it will be easy for players to complain about being bored long before they’re executing anything that looks even close to what I’ve described above. But you have to keep after them.
Once your players have achieved at least a minimal level of confidence, it’s time to bring out the stopwatch. Tell them you want them to throw and catch from 40 feet or 60 feet (depending on their age) with no throw-aways and no drops for one minute. Then start the stopwatch, and call out the elapsed time or the time to go in 15 second increments.
Sounds easy, right? There’s no minimum number of throws and catches required, no time pressure. Just a limit on how long they have to do it.
Allow about a half hour minimum, especially if your team’s mechanics aren’t so hot at first. Just the fact that there is no room for error will create some problems. But any flaws in the throwing motion will be amplified under pressure, and pretty soon even your best players may be throwing balls that hit the dirt or go sailing over their partners’ head.
Calling out the time puts even more pressure on them – again, even though there are no minimums to hit. Knowing that only 15 seconds has gone by gets in their heads. So does knowing there are 30 or 15 seconds left, because they start thinking “don’t make a mistake” instead of focusing on their mechanics.
It can be frustrating. It can be maddening. But it will be worth it when you don’t have to hold your breath every time one of your players winds up to make a quick throw. With good mechanics the ball will go where it’s supposed to. When that happens on a regular basis, you make things easier on the defense, pitcher, and even the offense, and you’ll win a lot more games as a result.
Don’t be one of those coaches who skips over teaching throwing. Put emphasis on it, demand excellence, and it will pay off for you big time.
Building a more effective practice plan

This is probably old hat for those of you who have been around fastpitch softball for a while, but it is definitely valuable for those of you who are new to coaching.
First of all, thank you for stepping up. Coaching isn’t easy, and it can be very time-consuming, but with the right attitude it can also be very rewarding. Not necessarily financially, but personally.
That said, if you’re new to coaching a team here is one of the most important lessons you can learn early: there is nothing more counter-productive to success than players just standing around waiting to do something.
The absolute worst, of course, is the typical rec league practice where the coach pitches to one player while the rest stand around in the field waiting until the ball is hit. Never, ever, EVER make that your practice, because basically you have one player sort of learning something, or possibly improving, while everyone else is having their time wasted.
What you want to do instead is plan out your practices so every player is getting a lot of touches/swings/repetitions throughout the entire time.
One good way to do that is to split your team into two or three groups (depending on what you need to do) and then have each group doing something different. For example, one group can be fielding ground balls that are hit to them, another can be fielding fly balls that are thrown or hit to them, and a third can be working on hitting. The hitting group can even be going through a series of drills/activities to keep things moving even more.
If you have two groups, one can be working on throwing drills/form while the other does hitting or fielding. There are plenty of variations, especially if you have good assistant coaches or even willing parents on hand.
What if you’re by yourself and need to keep the entire team together? You can still keep things moving quickly. Throwing drills like the star drill, or around the horn where you throw left and run right, can build skills while again keeping things moving. If your team needs to hit, you can pair up players and run six or seven hitting stations at the same time. All you need is a fence and some tees, although portable nets also help.
You can even do combo drills. One I liked to do was to have one group hitting off front toss while a second group worked on base running skills such as recognizing ground balls faster or going from first to third on a ball to the outfield. Lots of activities for small groups let you keep practice active. Constant repetitions also allow you to build conditioning into skills rather than having to do it separately during practice.
So how do you work all this in? I used to use the outline function in Word to list out everything I planned to work on that day. There would be a heading, and any notes or specifics would fall under the heading as sub-bullets. But the real key was placing times against each section.
For example, if we were going to do groups for hitting, infield, and outfield, I would look at which would take the longest to get through and place a time against it. Then I would extend that time to the other two groups, making sure to have enough different things to work on to keep them interesting.
In this example, say we had three groups of four. If I set up four hitting stations at five minutes each, that was 20 minutes. Infield and outfield would also be 20 minutes, with two or three drills depending on what was needed. Rotate through all three groups and there’s an hour’s worth of practice right there. Add in warmups, dailies, a five-minute break, and some situational work and you have a great, active 2-hour practice.
Of course, I’d usually have one or two other activities on the list, just in case we ran short (although we rarely did). Anything we didn’t get to this time would go on the list for the next practice.
If we were indoors in batting cages, I often would bring in players in groups of three or four for 45 minutes at a stretch. That was plenty of time to get them lots of hitting reps while keep the group size manageable. When their 45 minutes was up the next group would come in, then the next. It was quick and intense for the players, although it did keep the coaches there for 2:15 instead of a typical 2 hour practice. Still, much was accomplished that way.
One other important element in building practices is one I learned from John Tschida at the University of St. Thomas: never have the same practice twice. Always, always mix it up. It builds more skills, and keeps it more interesting for the players.
Fastpitch softball is a tough game, with much to learn – both in terms of skills and strategy. It requires a lot of anticipation and snap decisions based on a multitude of ever-changing factors. That’s what makes it exciting. But that’s what also makes it critical to use your practice time wisely. There just isn’t any time to waste.
Keep things moving at practice and soon you’ll be the coach everyone wants to play for.
Helping fastpitch catchers learn to throw to bases faster
In fastpitch softball, as in baseball, catchers tend to make their bones in two areas above all else. One is their ability to block pitches in the dirt. The other is their ability to throw out baserunners, either on steals or pickoffs.
Key to the latter is the ability to make a quick throw. While having a strong arm is important, a strong arm can be offset by requiring a slow, deliberate release. And for  catchers whose arms are not the strongest, having a quick release becomes even more critical.
One of the ways you can speed up a catcher’s release is by getting rid of the need to “find” the base first. In other words, when the catcher goes to throw the ball – either on a steal or a pick – she shouldn’t have to look at where the base is and process the information.
Instead, she should just know instinctively where it is. The tenth of a second or two she saves by not having to “find” the base first can make the difference between safe and out.
Even the runner is safe, if it’s just by a hair it will serve as a warning to the other team’s coach not to get too adventurous on the basepaths. After all, coaches generally don’t test the catcher’s arm/release with their slowest runners – they use their fastest. If you can make it a photo finish with the fastest runner, it’s unlikely the coach will be anxious to send the rest.
So how do you get catchers to throw with more instinct? One of my favorite methods is by using a blindfold. Here’s how it works.
First, you must have already trained your catchers on proper technique, including the need for urgency. If you haven’t done that first, stop now and do that, then come back to this idea.
If you have, however, then it’s time to bring out the blindfold. The catcher starts with the ball in her glove and the blindfold in place. Make sure she’s in line with where she would normally set up, then have her get into her runners on base stance. Tell her to visualize where the base you’re throwing to is. I usually like to start with throws to second.
When she’s ready, either blow a whistle or yell “she’s going.” At that point the catcher pops to her feet (or drops to her knees if she can throw that way) and executes the throw as quickly as possible.
If she has a good feel for where the base is without seeing it, and good technique, she should be able to make the throw reasonably close. If she doesn’t, it could go anywhere and you’ll know you have some work to do.
If the throw goes offline, be sure to tell the catcher where it went so she can get a feeling for the difference between where she thinks it is and where it actually is. Also be sure to watch as she makes her throw for mechanical flaws (such as not pointing the front shoulder at the target) that can throw her off.
One way to make it more interesting is to offer a prize. This is particularly effective if you’re working with multiple catchers at once, since once one of them is successful it will spur the others. I’ve used a stick of Chapstick, a pack of gum or a roll of Mentos as prizes. You can select whatever you want.
Having a competition for a prize is a great way to end a training session, by the way. I like using this type because everyone has a shot at it (versus having only one winner) if they execute properly.
To add a degree of difficulty, have the receiver sit on a bucket or a chair. That cuts the adjustability of the receiver, so the throws really have to be spot-on. If you’re working with multiple catchers, you can add in some conditioning by having one be the thrower, one the receiver, and another chasing down errant throws. Give the thrower one shot, then she sprints down to become the receiver, carrying the ball with her. The running not only helps them build their legs but also fatigues them, helping simulate the feeling of having played a couple of games already.
This drill/game can be used for any base. It can be particularly interesting for right-handed catchers to learn to throw to first base on a pickoff attempt since the moves will have to be stealthy and they must rotate beyond the 90 degrees required to throw to second. It can get pretty random, especially outdoors, so your “chaser” will get a good workout in.
Throwing to bases blindfolded can be pretty challenging at first, so keep them encouraged. Let them know there is a degree of difficulty involved, and there’s no shame in not being able to do it at first.
But if they CAN learn to throw to bases instinctively, without seeing, the whole process will become a whole lot easier when they’re not blindfolded.
Don’t be surprised, by the way, if this quickly becomes your catchers’ favorite drill/game. The ones I’ve used it with usually will ask if they can do it, or will select it if given a choice of how to close out practice.
Truth is it’s not only challenging – it’s fun. And a point of pride when they’re able to make the throw.
Tossing out baserunners takes a lot of instinctual play. This is a great way of helping to build those instincts.
Make throwing priority one in the fall
This is the time of year when hope springs eternal. The long, hot summer is behind us (more or less), and with it the urgency of performance in games.
Yes, there are games going on right now, but for the most part they’re either college showcases, scrimmages, round robins, or friendlies. So with that in mind, coaches have a chance for a fresh start with their teams, to do what needs to be done to prepare for next summer. 
There is always plenty to work on – hitting, pitching, fielding, baserunning and so forth. As a result, it’s easy to rush through throwing warmups to get to the “more important stuff.”
If you do that, however, it’s an opportunity lost. Because few things will make more of a difference to your team next summer than improving the way your players throw.
Why is that? Simple. There is evidence that 80% of all errors in a game are throwing errors. Whether it’s because of poor technique, or being rushed (especially after bobbling a ball) or some other reason, it’s the throwing errors more than fielding errors that will hurt your team’s chances of winning when it counts.
Think about it. If a fielder doesn’t field a ball cleanly on a ground ball, the batter/runner gets first base. But if she throws the ball away, the same batter runner could end up on second base. She will definitely end up there if the ball goes out of play. So that poor throw after a bobble turns one error into two, and one base into two as well.
 On the other hand, if you can eliminate throwing errors that means you’ll eliminate 80 percent of all the errors your team will make. Making that many fewer errors than your opponents should put you in a much better position to win.
That’s great in theory. But how do you go about it?
Start by planning to spend quality team teaching your players how to throw. Even older players often need this instruction. Give them strong mechanics, and make sure they’re repeatable. This could end up taking up a half hour to an hour, by the way.
After going through the basics, challenge them. One of my favorite drills is one I call the One Minute Drill. Here’s how it works.
Line your players up across from each other (partner position). Hold a stopwatch and tell your team that all you want them to do is throw and catch without a throw away or a drop for one minute. There is no requirement for how many, they just must keep throwing and catching. Then tell them you will keep time on the stopwatch, and call out the time remaining.
Sounds easy, doesn’t it? Actually it’s not. It’s almost a certainty that there will be a drop or throw away in the first round, probably within the first 20-30 seconds. When it happens, call a stop and when everyone is ready have them start again.
Keep them going, and be sure to call out the time loudly. I usually go in 15 second increments. The pressure of having to perform perfectly for a minute will generally affect their nerves, which leads to mistakes that re-start the clock.
If they continue to struggle after several attempts, call the team together and ask them why something so seemingly simple is so difficult to execute. They’ll usually come to the realization it’s pressure and focus. Tell them to relax and work on throwing well. Eventually they will get it. Then let them know how long it took to get just one minute’s worth of perfect throws and catches.
If you do this every practice, eventually your team will be able to complete the exercise in one or two attempts. When that happens, you’ll no doubt find your team’s throwing in games has improved as well. Because you’ve spent a lot of time on throwing, but in a way that is challenging rather than boring.
Give the One Minute Drill a try. It definitely works.
Different throws for different positions
The other day as I was getting ready to start teaching a catching clinic I was watching the participants as they warmed up to throw. It was clear that they had been taught the old rhyme, “Thumb to the thigh, raise it to the sky, wave bye bye.” 
That’s fine as an early teaching tool, or for outfielders who need a big arm circle to throw far. But for many positions that same motion is a time waster.
Once players get their basic throwing motions down, it is important to start making adjustments based on position. As a rule of thumb, the closer a player starts to home, the shorter the arm circle should be.
Clearly, catchers will have (and need) the shortest arm circles. The most they have to throw is 84 feet, 10.25 inches (home to second), and when they do it they usually have about 2 seconds or less to make that throw. Dropping the thumb to the thigh takes up way too much of those 2 seconds.
Instead, they should bring the almost (but not quite) straight back, making a very small arm circle that dips down and then comes up quickly before throwing – all in one continuous motion. That last part is very important, as any hesitation at all gives the runner more time to get to the base.
Infielders will likely have a little larger circle, although part of that depends on whether they are moving toward or away from the base they’re throwing to. A shortstop going into the hole, for example, will need a larger arm circle to make the long throw. The same shortstop moving in and to her left will make a quick release.
Third or first basement fielding a bunt will also have a minimal arm circle, trading that extra power for a faster release. Generally they’re a little stronger and can put some zip on the ball without too much circle.
But it can’t be a straight pullback either – what I call a Katniss Everdeen throw because it looks like you’re firing a bow and arrow. A small arm circle will provide the action/reaction needed to get the ball there quickly.
Once you understand this, it’s important to have players practice these throws. Which means they may need to consciously work on different types of throws during warmups if they play different positions. For example, a catcher who also plays outfield may want to start with a full motion to loosen up, switch to a catcher throw around 60 feet, then go back to a longer motion if you’re extending it further.
The more they understand the different types of throws, the better they’ll be able to execute them in the games – and the better chance you’ll have of getting more outs. Especially on close plays.
Do you have your players work on different types of throws by position? If so, has it helped? Anything you wish your players did differently?