Category Archives: Product Reviews
Product Review: Portolite Signature Spiked Practice Mat
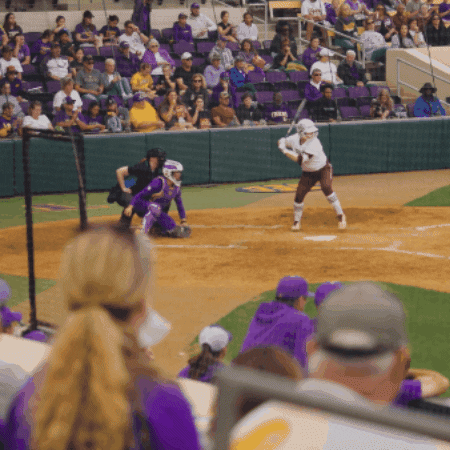
Having a good-quality practice mat for indoor pitching practice is an essential to me. It helps cut down on “gym stepping” (taking a step forward with the pivot foot before launch) and gives some good feedback about the direction the pitcher is going and distance the she is covering in the drive phase of the pitch.
For years I have used a mat designed for use on turf. It was good for two of the facilities I work at, both of which have very low-pile, carpet-like turf. But at the third, which has turf that is a little more grass-like, I found that the mat would slide forward and turn toward the throwing hand-side after two or three pitches for all but the smallest girls. Which meant that I would have to stop the lesson and readjust the mat pretty frequently.
The solution I came up with was to turn the mat backwards so the pitcher could use the pitching rubber to push off of but would then land on the regular turf. It solved the problem of the turning mat, but made it kind of pointless to have an 8 foot long mat since most of the mat would be in the opposite direction to which she was going.
Finally, I decided to do what we all do in these frustrating situations – search the Internet for a solution. I finally found one I thought would work: the Portolite Signature Spiked Practice Mat. I have used and liked Portolite products before, so it definitely caught my interest.
But the cost was a little high, which caused me to hesitate before pulling the trigger (more on that later). Finally, I saw a Black Friday sale and decided to roll the dice.

I’m glad I did, because it is definitely up to the task of staying in place on higher turf, even with the biggest/strongest/heaviest pitchers. No more turning, no more sliding forward, no more resetting the mat every few pitches.
You just lay it down wherever you want it and it stays there for hours or even days without having to touch it. Here’s a little more in-depth look.
(NOTE: There are no promotional considerations for this review. I purchased the mat as a consumer and am not being paid to write this review. Just thought you should know.)
Basic construction
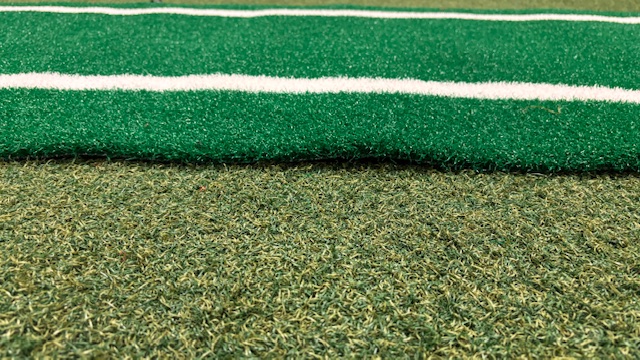
The mat definitely features high-quality construction. The turf side is thick and built to hold up to heavy use, and the back side appears to be made of heavy-duty rubber. The two are attached seamlessly and look like they will hold up for years without splitting apart.
(For contrast, the turf and backing on my Jennie Finch mats began separating at the front edge shortly after I got them, and I occasionally have to glue them back together to reduce the chances of them coming apart completely or having a pitcher trip over them.)
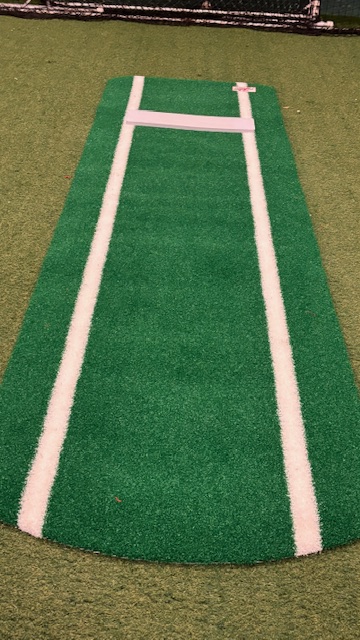
The pitching rubber isn’t just glued to the mat – it is bolted on with four bolt and nut combinations that are incorporated somehow into the rubber then stick out of the bottom.
I don’t think that pitching rubber is going anywhere. This construction also means (according to the manufacturer) that you can replace the pitching rubber at a later date if it gets too worn or damaged.
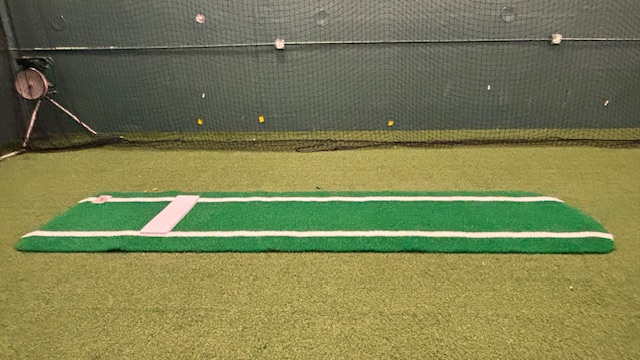
The overall length of the mat is 3 feet wide by 11 feet long, with 8 feet from the rubber to the end of the mat. That should be sufficient for most pitchers, while also leaving a generous 3 feet on the back side so both feet can start on the mat, even with a deep drop back.
The lines appear to be deeply sublimated or otherwise embedded into the turf so I don’t think you I have to worry about them wearing away any time soon. I wish there was a center line instead of (or in addition to) the two lines extending down either side from the pitching rubber, since I think that makes a good reference for pitchers.
But it’s not a deal-breaker, and I suppose I’ll get used to it. You can also order the mat with no lines if you prefer.
The turf comes in three colors – green, red, and clay – so you can choose the one that suits you best. I’ve always had and liked green mats so that’s what I went with. It’s a bright green right now, but we’ll see how it holds up after hundreds of shoes have slid across it.
I can’t speak to the durability yet since I’ve only been using it a few weeks. But it looks like it ought to hold up for years.
One other thing that takes a little getting used to is that it feels a little spongier than the other mats when you walk or land on it. That’s probably good for young backs and knees versus landing on hard concrete with just a thin piece of carpet over it.
The Spiked Side
Here’s where the real magic happens, at least for me. As I said, the whole reason I purchased the mat was to try to solve the problem of the mat slipping on the turf. It has definitely done that.
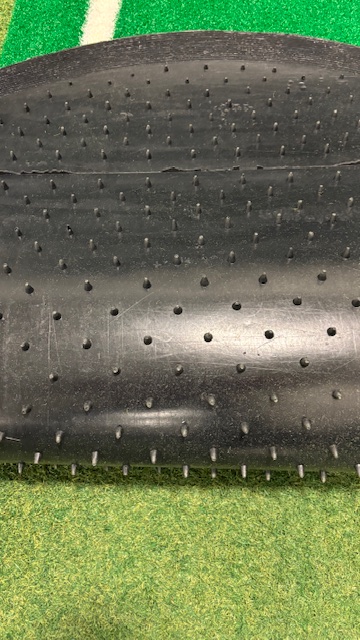
The key is the 1,200 little spikes on the bottom side. They are molded as a part of the heavy-duty rubber backing, creating a plethora of individual grip points.
As pitching people know, the goal is to land into the front foot like an airplane rather than on top of it like a helicopter. That momentum is what can cause the mat to twist or slide forward.
With the Portolite mat, though, all those little spikes distribute the landing load throughout the mat so it stays in place easily. I have yet to have to make any adjustments, other than to change the distance for different age pitchers.
But once it’s down, it’s down until you pick it up and move it. So yes, total success for the goal I had.
And in case you were wondering, while it does leave a pattern of little indentations when you first pull it up to move it or put it away, those indentations go away quickly, leaving the base turf looking like it did before you laid the mat down. That’s important if you’re in a shared space like I am.
Heavy weight
Another reason I think it stays in place so well is that the mat itself is heavy – probably due to the molded rubber backing. It weighs 30 lbs., which is roughly 50% more than my other mats that clock in at 23 lbs.
That’s great for functional use, but it can be a challenge if you have to carry the mat for any distance. I’m a pretty big guy so I can handle it, but it’s definitely something to consider if you are on the smaller side or not particularly strong. It will give you a workout.

I wish it came with a little carrying pouch like other brands do, which I think would make it easier to transport. Then again, because of the construction the Portolite mat doesn’t roll up as tight without great effort so maybe it would be difficult to get one in an appropriate size.
Either way, right now I have to roll it up and grab it by either end to move it around the facility, It’s the one time when I miss the other mat.
The cost
Earlier on I mentioned that it’s not cheap. The current price on the Portolite website (as of January, 2026) is $999 USD.
When I first saw that I decided to roll the dice and see if there might be a Black Friday sale since it was getting close to the holidays. My gamble was rewarded, and I was able to purchase it for $799.. Add in the tax and shipping and it was $935 out the door – still expensive but every little bit helps.
Assuming it lasts for several years (as it appears it will), it’s not so bad. For example, at 5 years of use that $935 works out to $187 per year. Add in the savings on chiropractors for not having to constantly bend over to reset the mat and it’s a pretty good bargain.
More options
Portolite has some other mat options in addition to the one I purchased, including a shorter throw-down mat for $299 and their Pro Spiked Game Mat for $1,899. The short mat would be great, I suppose, if you don’t need the full length for your pitcher to land on (or you don’t want to carry a 40 lb. mat around).
The game mat is similar to the practice mat but I believe the turf is even heavier duty, it includes 1,700 spikes (versus 1,200 for the practice mat), and it weighs 60 lbs. Clearly it is made to hold up to heavy use and abuse, even on outdoor surfaces.
I know of at least one program that is planning to purchase a couple to use on dirt to try to eliminate the dreaded “pitcher’s trough” that happens after multiple games in a day.
The bottom line
When I was first looking at this mat I was concerned because it was a lot of money to pay for something that I wasn’t 100% sure would solve the issue. But I am happy to report that it did solve the sliding/turning problem, and my pitchers like using it.
So if you’re having similar issues, know that you can purchase this pitching mat with confidence. Time will tell how well it holds up (maybe I’ll share a report on that sometime in the future) but I can definitely recommend it as a solution for the immediate need.
Product Review: pitchLogic Softball

For those who have been hiding under a softball-shaped rock over the last few years, data has become an increasingly important part of our sport. Whether it’s statistics about on-base percentages, whiff percentages by pitch location, how much external rotation is being achieved, or other detailed metrics, coaches at all levels are looking to quantify what their athletes are doing to help improve performance.
This obsession also applies to what happens when a pitcher throws a specific type of pitch. Speed is obviously one important metric that has been easily measurable for a number of years, whether it was with a Stalker or Jugs radar gun or more recently with the advent of the PocketRadar.
The other two parameters that are normally listed along with speed are spin and spot, i.e., how the ball is spinning and whether it goes to the location it was supposed to. Spot is fairly easy to determine with your eyes alone; if you know where the ball was supposed to go you should be able to see whether it went there.
That leaves spin. One simple way to determine whether a ball had the correct spin is to mark a stripe or color the seams to make it easier to see the spin direction, then compare that to what is expected for that pitch.
For example, if you’re throwing a curve ball was the spin direction going around the ball at the “equator” (middle of the ball), going from pole to pole (top to bottom or bottom to top), or some variation in between? You also want to see where the spin axis (the point the ball spins around) was, because an improperly oriented spin axis will generally have a negative effect on the quality of the movement.
You can see all of that with your eyes, but it’s still difficult to quantify. And you totally miss another important factor in ball movement: how fast the ball was spinning. You can see if it’s fast or slow, but not HOW fast or HOW slow, which also affects how sharply the ball will break, thus making it harder to hit.
A Rapodo system will give you those types of answers, but those cost thousands of dollars which puts them out of the reach of most individual coaches and bucket parents. You pretty much have to go to a camp, clinic, or measurement event to capture that data, and even then it’s only a single snapshot in time.
In the past, you had the RevFire ball or the Diamond Kinetics ball, which were far more affordable to the average user. But both of those have been long been relegated to the ash heap of history; you can probably still find one on eBay somewhere but all technology has a “best by” date and both of those are long past it.
Fortunately, a new entry into this category was introduced in 2025: the pitchLogic softball. F5 Sports, the manufacturer of pitchLogic balls, has had a baseball version for several years that has become quite popular.
They have now taken that same technology and applied it to fastpitch softball. But is it worth the investment, i.e., does it do the job? The short answer is yes.
If you’re serious about measuring spin direction, spin rate, spin efficiency, and a whole bunch of other parameters and don’t want to break the bank (or your marriage) to do it, you’re going to want to look into this innovative product. Let’s break it down in more detail.
What’s In the Box
This part is pretty simple. It comes with one pitchLogic softball, a Qi-type platform charger, and a short USB A to USB micro cable to connect the charger to a power source. The charger has a small indent in it to keep the ball in place while charging – no O ring necessary (DK ball users know what I’m talking about).
How It Works: The Basics
The pitchLogic softball system consists of two components: a ball with a microchip or some other technological magic inside of it and a free companion app, which you can download from the Apple App Store or Google Play once the ball arrives. The two are connected via Bluetooth, which means you don’t have to have a WiFi signal available to use it.
There are two versions to the app: a player version and a coach version. If you’re a bucket parent who wants to measure your own daughter’s performance and progress, the player version will do you just fine.
It will capture the data from each throw and store it in the cloud for you so you can review it later or even share it with college (or other) coaches. Since you’re only using it with one pitcher it’s really all you need.
The coach version allows you to create a roster so you can track the performance of multiple players, separating them into individual sessions so you can access them as-needed. You just have to remember to select the correct player before you start the session – nota difficult skill but one I’ve already failed on once.
Setting up a player on a roster is easy to do, too. You click on the roster button at the top of the app, click Manage, then click on the plus sign (+) and fill in the requested data. If you want to remove someone from the roster later you click on the minus (-) sign and they are deleted.
The player management section also gives you the ability to share all the data with the pitcher automatically by inputting her (or her parent’s) email address. They will then receive a link that enables them to check it all out themselves whenever they want.
When I purchased the ball it came with five roster spots. If you’re a team coach that’s probably plenty; if you’re an instructor like me it’s not nearly enough, but fortunately you can purchase additional roster spots for an added cost.
Capturing Pitches
Whichever version you have, once the proper player is selected and the ball has been paired to your device, you click on the start session button and then select which type of pitch the pitcher is throwing so it can be tagged in the records. You don’t have to tag the pitches, but it’s definitely helpful, especially when you go back a few days later to review the data or if you want to send it to someone else. Helps to know what type of pitch was being thrown.
The pitcher then throws the pitch and the data immediately shows up on your device’s screen. I generally just use my iPhone because it’s handy, and the key information is pretty readable even to my old eyes.

Hopefully in the future they will add the ability to zoom in by pinching the screen, which would make it even easier while helping the pitcher focus on the right information.
The only caution is that the pitcher has to keep the ball still before she throws the pitch or the app won’t read it. If you have someone who likes to twizzle the ball or spin it in her glove before she throws she’s going to have to remember not to do that for the duration of the session.
So far, I have found that the pitchLogic softball records most, but not all, of the pitches thrown. I’d say it’s around 95% success. Every now and then it will miss one, but it usually captures the next one.
If you have a few missed pitches in a row, stopping the session and then restarting it usually solves the problem. Worst case you can close the app and restart it to reset everything. So far I have not had it totally shut down.
The Data
Ok, here’s where it gets fun. It starts with the clock face, which appears on the top or top left depending on whether you orient your device in portrait or landscape mode. For simplicity I am going to refer to everything’s position in landscape mode.

The clock face gives you three important pieces of data at a glance: the spin direction in blue (including the orientation of the ball), the arm slot in oranage (where the arm was at release), and the last touch on the bal in a darker orange or rust colorl. If your pitcher is having trouble with her spin orientation, that last touch info can be helpful in diagnosing it.
The blue arrow shows the direction in which the ball was spinning. For example, a “perfect” riseball will point to 12:00, a “perfect” drop ball will point to 6:00, and so on. The blue ring shows the orientation of the ball as it is spinning.
So let’s say a right-hander throws a curveball and the arrow points to 9:00, which is the perfect spin for left-to-right. But instead of the ring part being pretty much flat it is a near-perfect circle. That tells you that even though the spin direction was good, the spin axis is tipped either too far forward (most likely) or backward toward the pitcher (unlikely but you never know).
You now know that even though the spin direction was good, you still need to make adjustments to get better, tighter break on the ball. This relationship is also shown under “spin efficiency” at the bottom.
The closer the arrow and ring are being aligned, the higher the efficiency and again the better the pitch will break. Honestly, even though I’d heard that explanation it took me a little time to truly understand. Good news is once you get it it’s pretty easy to understand from then on.
Other metrics that appear along the bottom include pitch speed, total spin or spin rate in revolutions per minute, vertical movement, horizontal movement, spin efficiency (see above), and spin/velocity ratio. Here’s a quick explanation/evaluation of those metrics:
- Speed – How fast the ball is moving. Most people I know who use the pitchLogic softball tend to disregard this reading as it can vary from what a dedicated radar will read. The explanation I’ve heard is that it measures the speed immediately out of the hand whereas a radar gun takes multiple measurements along the ball’s flight path and averages them. The speed readings are sometimes fun to look at but I wouldn’t personally use those as the official measurement because it’s not repeatable when a radar gun is being used.
- Total spin – Super important reading. The faster the ball is spinning the better the pitch will perform, providing it’s thrown well to begin with. You want to push those spin speeds up high, so definitely want to pay attention here. For those who still think in terms of RevFire’s revolutions per second, you can use a little math to draw up a correlation chart.
- Vertical movement – A prediction of how far up or down the ball will deviate from a straight line out if thrown on a straight line out. Upward movement is shown as a positive number, downward as a negative number. Be aware, though, that it doesn’t record the actual movement, just the expectation. I’ve seen riseballs that went straight down with great spin get shown to have pretty significant upward movement so use with caution.
- Horizontal movement – Same as vertical movement, but left to right, with left movement shown as a negative umber right movement as a positive number.
- Spin efficiency – As noted above, this is how much the spin direction and orientation of the ball align with each other. For a curveball, a 9:00 reading with a flat ring would be 100%. You want to shoot for 90% and above. Realistically, you may be surprised how low the efficiency is in the beginning, even on pitches that appear to move well.
- Spin/velo ratio – I haven’t used this one much. I think you have to establish a baseline of speed with a fastball first. Then you’ll see with this reading how close other pitches are to the fastball’s maximum velocity. If that’s not correct hopefully someone will clarify but at this point that’s my understanding.
Those are the home screen parameters. But as they say on the TV commercials, wait! There’s more!

Tucked behind the home screen tabs are additional tabs. For example, in addition to the clock reading you can also see a scatter chart of all pitches for that session (based on the predictions, not actual performance), video if you shot some video (more on that later), and a 3D representation of actual ball trajectory that you can view from different angles by dragging the picture with your finger.

The section on the right, besides showing the basic input screen, also has tabs that let you review specific sessions for that pitcher, each pitch that was recorded, and a more detailed metrics page that shows more in-depth data than the home screen. In portrait view, the “All Metrics” tab appears next to the focus metrics listed in the bullets above.
Reporting

As cool as the in-app data is, the pitchLogic softball can also generate a web-based report that shows you graphs and scatter charts for the entire session that make it easy to see how well the pitcher performed that day. You can also share this information with the pitcher, her parents, or other coaches by copying and pasting the web link into a standard email, text, or other type of message.
Video capabilities included
Another nice feature is the ability to shoot video of the pitch and have it embedded with the rest of the information. I find this very helpful for when a pitcher is struggling to get the correct spin.
For example, one girl was getting good apparent movement on her curve but the metrics said she had more of a dropball release. After shooting video we saw that her wrist was extended back instead of flexed upward going into release.
That visual helped her correct the issue and improve her metrics almost instantly. Seeing, in this case, was definitely believing.
Durability
We all know a tool like this can take a beating, especially if you use it a lot. So far, mine has held up well despite hitting concrete floors barely covered by turf, catcher’s equipment, metal backstops, and whatever else is around for an errant ball to hit.
A nice additional perk is that the manufacturer offers you the option of replacing the cover of the ball every six months on-demand and at no charge. No need to worry if it gets nicked, or if the cover starts to show wear or get slick. They literally have you covered.
Customer Service
This is another area where the pitchLogic softball manufacturer F5 Sports excels. I bought one of the “first run” balls, which had some issues. When I contacted them the people at F5 immediately acknowledged they were having some issues and said they would replace the ball as soon as they had worked out the kinks.
They were as good as their word. The new ball has sat in the trunk of my car through blistering heat and below-freezing temperatures and continues to work great.
That said, their website could use some improvement. For example, there is no place to purchase extra player accounts on the website – you have to contact them to do it. Being able to place an order like that online, with no human interaction, would be much more efficient.
Cost
By now you’re probably wondering what does all this wonderfulness cost? It’s not cheap, but i’s not crazy either.
An individual one-year membership, which includes the ball, the app, and the re-covering option, costs $300. You can save a little money with the two-year membership, which costs $495. Both options require you to pay the full amount up-front.
The website doesn’t list a price for the Coach option that allows for multiple players (and coaches), but I believe the annual subscription is $500. At least that’s what I recall them saying, although the final price depends on how many roster spots you need to include.
Again, not cheap, but when compared to the other options for capturing this type of information it’s a bargain. Especially when you realize it’s much simpler to operate and not fussy at all about how you set it up.
Recommended
The bottom line is that the pitchLogic softball is a tremendous tool for training pitchers to learn how to spin the ball properly in order to maximize their effectiveness in this important parameter.
Whether you want to help just your own daughters/players or you’re helping multiple students, the pitchLogic softball is a smart, high-value investment. If you have the means, I highly recommend purchasing one sooner rather than later. You’ll be glad you did.
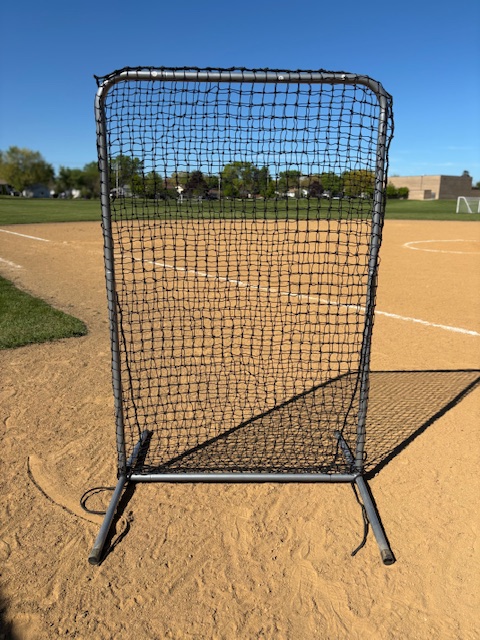
Product Review: Cimmaron Safety Net and Frame Makes BP Safer
Whenever I see a coach doing front toss at practice from 15 feet away without a net to hide behind, my first thought is always “That coach must not have much faith in him/herself as a hitting coach.”
But the reality is (most of the time anyway) that they would use a screen if they had access to one. Sure, you could try using a Bownet or similar product but the blowback on a hard-hit ball directly into the net would probably negate any value in setting it up.
Effective protection, even from some 10 year olds, requires a much sturdier protective screen – the type you see at high schools, colleges, batting cages, and professional stadiums. The trouble there is your typical youth coach, or even a high school coach who has to practice at an off-campus field, can’t exactly cart around a heavy-duty screen with a heavy-duty net, nor do they have the time to assemble and disassemble it with all the nuts and bolts that are required.
For years I had that problem solved with the old Jugs Snap-Together Screen. It was the perfect solution – a heavy-duty net that slipped over a heavy-duty frame that was easy to put up and take down. The push–in snapping mechanism meant you could slide the pieces together, then have the snaps hold them in place. Then, when it was time to leave the field, I could quickly pull it all apart and put it back in the carrying bag, ready to transport anywhere I needed it.
All good things must come to an end, however, and last fall that screen gave up the ghost. Some of the snaps didn’t work anymore, and the net was beginning to fray, which increased the risk of a hard-hit ball breaking through.
Since Jugs doesn’t offer that product anymore I searched and searched for something similar to replace it, That’s when I came across the Cimmaron 6×4 #42 Safety Net and Screen at Epic Sports.
It’s a little smaller than the Jugs screen was, but it was still big enough to hide behind after throwing a pitch. (One time when it pays to be a little under 6 feet tall.)
The description mentioned a snapping mechanism but there weren’t any closeup photos to show if what they meant and what I thought of were the same. But with no other viable alternatives I figured I’d give it a try and made the purchase.
I’m happy to report it’s everything I hoped it would be.

The 1-1/2 inch steel tubular frame is lightweight yet very strong and confidence-inspiring. The net, made from #42 nylon, has held up well after take some direct hits; I have full confidence in it.
It’s also a little easier to assemble than my old protective screen was, probably because it’s a little smaller than the old one so there are fewer pieces to assemble. There are three pieces that comprise the bottom, two along the sides, and three that form the top and the upper part of the sides.
All parts have a number sticker on them that correspond to the supplied diagram that shows you how to put it together. The first time I did it I had a little trouble figuring out what went where but that was due to operator error.
I didn’t bring the diagram with me to the field, and I then assumed the two pieces that form the top corners worked the same way as the Jugs screen, i.e., the long part goes across the top and the short part goes down to join the side. When that didn’t work it was easy enough to figure out how to put it together properly and it’s been a breeze ever since.

The net is also easy to put on. It has a pillowcase-type of structure – the top and sides are closed while the bottom is open, so you can quickly slip it on and off the assembled frame. There is also a nylon rope at the bottom that allows you to secure the bottom of the net so you don’t catch a hard ground ball to the feet.
Unlike the Jugs net, there is no hole in center to pitch through. That’s ok, though, because I am used to turning L-screens with the tall side to the right and pitching around it, so it’s essentially the same.
It’s even a plus in some ways because a ball with a little tail to it won’t come across the frame, unlike the hole-type where I got clipped a few times with a line drive even though I swear I wasn’t standing in the hole.
The only downside I see to this product is that it doesn’t come with a carrying back. That seems like an oversight given that the quick up-and-down construction makes me think it was designed for portability.
Fortunately I still had the Jugs screen carrying bag so I’m using that. I also tried a speaker stand carrying bag from Sweetwater, which worked ok too. Neither one is quite deep enough to fully close because of the design of the two base pieces, but they are both wide enough and will both work as long as you’re careful getting it in and out of the vehicle.
I’m guessing the manufacturer opted not to offer a bag to keep the price down, but it sure would be nice for one to be offered even if it’s a separately purchased accessory for those of us who need to cart it in and out on a regular basis.
Speaking of price, the Cimmaron protective screen is relative bargain in my opinion. It’s just $179 for the frame and net. When compared to the cost (and time) of a visit to the emergency department or immediate care facility after taking a line drive to the head it’s definitely worth it.
And if you want to add padding around the frame it costs a little more but if your goal is to put it up and take it down the same day it feels to me like you’re better off without the padding.
So if you’re a coach who is pitching front toss with real balls to your team and want to feel a little safer while doing it, check out the Cimmaron 6×4 #42 Safety Net and Frame. In my opinion it’s worth every penny. And yes, I paid for my own.
My good friend Jay Bolden and I have started a new podcast called “From the Coach’s Mouth” where we interview coaches from all areas and levels of fastpitch softball as well as others who may not be fastpitch people but have lots of interesting ideas to contribute.
You can find it here on Spotify, as well as on Apple Podcasts, Pandora, Stitcher, iHeart Radio, or wherever you get your podcasts. If you’re searching, be sure to put the name in quotes, i.e., “From the Coach’s Mouth” so it goes directly to it.
Give it a listen and let us know what you think. And be sure to hit the Like button and subscribe to Life in the Fastpitch Lane for more content like this.
Product Review: Chargeball a Bright Idea for Extending Practice Time

So there you are. You rushed home from work, fighting traffic all the way (and getting home 20 minutes later than usual) so you can take your daughter out for a little practice session to help her improve her skills and/or get ready for the next game.
Unfortunately, it’s the time of year (early to mid-spring or late summer to early fall) where it starts getting dark just about the time you get going. You’d like to stay a little longer and give her a full practice session, but twilight is setting in and, since there are no lights on the field and you can barely see your hand in front of your face, you’re worried one of you (probably you) is going to end up finishing tonight’s session at the local immediate care facility covered in blood.

Sound familiar? Well, don’t despair. There is a solution, and it’s the subject of today’s blog post: the Chargeball glow in the dark softball.
I recently aquired one of the Chargeball kits and can tell you from firsthand experience it’s a great option for extending lesson or practice time for an extra 15-20 minutes past when it would normally be safe to continue.
(Full disclosure: I paid for the product with my own money and have not had any contact with anyone at the company. My review is based strictly my own user experience, with no financial incentives or product offerings promised for delivering a favorable review. The opinions expressed here are strictly my own.)
I have used the Chargeball this week that took place after the official sunset (roughly 7:00 pm) and during the civil twilight hours. At that point I could see the pitcher and catcher, but just barely
As we went along I asked the catchers (who were also the pitchers’ fathers) if they could still see the ball okay and both said it was fine. This despite the fact that by the end I could barely see either of them from my vantage point about 20 feet away.
Ordinarily we would have had to stop about 15 minutes into the lesson at most. But by using the Chargeball we were able to go the full 30 minutes with no incidents or problems.
So how does the Chargeball work? It starts with the ball, which is the same size and weight as standard softball. It has medium seams, and so far good tack once you rub it down a little – same as any other brand name softball.
The key difference, however, appears to be a coating that is on the ball. It’s what gives the Chargeball its ability to glow in the dark.
To activate the ball you need to put it in the included vinyl case and connect it via a built-in USB connector to the included battery pack. The one that comes with the standard Chargeball package requires four AA batteries, but there is also a rechargeable battery pack available. More on that later.
You place the ball inside the case, close the lid, connect the battery pack, and wait about 20 seconds. When you connect the battery pack it actives a whole bunch of LEDs inside that light up with incredible brightness.
I know it’s that bright because I made the mistake of opening the lid and looking inside before disconnecting the charger and felt like I’d tried looking at the sun. In space.

When you take the ball out it is glowing brightly, and retains a decent glow for several minutes. That makes it easy to see as it is pitched, thrown, or hit.
When the glow gets too dim, just pop it in the case again for 20 seconds and you’re ready to continue.
The ball itself seems pretty durable. I haven’t used it much yet, but it has taken a few dives into the dirt and bounces off a chain link backstop and hasn’t sustained any damage.
The manufacturer says you can use it for batting practice so I imagine it holds up pretty well. While it would be expensive to purchase enough balls to do a full-on batting practice on an open field, it might be a good way to help hitters who are having trouble tracking the ball from the pitcher learn to watch it better.
If you use it when it’s fairly dark there would be little else to see BUT the ball. So it might help them get a feel for how to home in on the ball as it travels through space.
You could also use it pretty easily for fielding and/or throwing practice. Again, if you want your fielders to learn to watch the ball into the glove a little practice in the gloaming might be just the ticket.
For me, I’ve only used it so far for pitching lessons, but it’s worked well there. I recommend purchasing more than one ball so you can minimize downtime. While the pitcher is using one you can be charging the other so it’s ready to go when you need a recharge. Then rinse and repeat until you’re done.
Sounds pretty cool, doesn’t it? But, you think, surely all this wonderfullness must be expensive.
Actually, not really. You can purchase a single kit that includes the charging case and battery pack, one softball, and one baseball for $55 as of this writing. If you’d like two softballs and no baseball, it’s $59.
The package I purchased, however, is the real steal. They had a promotion going on that included not only three softballs but also one baseball AND the rechargeable powerbank all for just $79. Perfect for the coach or parent who wants to keep things going without breaking the budget.
I don’t know how long these promos will go on for, but they are active as I write this in September of 2024. The promos don’t show up or even get mentioned until you add the product to your cart so you may need to do that to verify the one I got is still available.
If not, an extra softball currently costs $35 and the powerbank if purchased separately costs $10, although I’m assuming any powerbank with a USB connection will work. As you can see, though, your best value is purchasing the bundle if it’s available.
Also, for those who are interested, they also have footballs, volleyballs, soccer balls, rugby balls, and basketballs so you never have to come in at night. At least until the neighbors complain.
For anyone who finds themselves constantly trying to squeeze in a few more reps before it gets too dark, I recommend checking out the Chargeball. It’s definitely a bright idea for extending practice – and avoiding injuries!
The Way You’re Training Your Players Could Be Hurting Their Performance – And Health
We’ve all been there. We have a player who turns out to be great, or we watch what great players do, and we study them intensely to figure out what they’re doing so we can replicate it with all our other players.
But then when we try to apply what we’ve learned we find it works really well for some, pretty well for others, and little or not at all for the rest. Some even see their performance level go down or even get hurt trying to implement what we’re telling them.
How can that be? we wonder. We did our due diligence and we know what we’re saying works. We’ve seen it work. So why isn’t it working here?
The answer is very likely to be related to something called “motor preferences®,” which can be simply defined as working with the way each body is designed to move from birth.
This is a concept I have been dabbling with for the last few months since learning about it from my friend and colleague Linda Lensch over at Greased Lightning Fastpitch. (If you’re in the Jersey Shore area she’s definitely the person to see about fastpitch pitching.)
I had previously taken an online course offered by Volodalen, a French organization that has performed 20 years of research into motor preferences and how they help athletes in all sports perform at a higher level while reducing injuries. But last weekend I had the opportunity to join a couple dozen of the best pitching coaches in the country for a two-day, in-depth, in-person training clinic hosted by James Clarke at United Pitching Academy in Centerville, Indiana. (Again, James is the guy to see in that area.)
The clinic was led by David Genest of Motor Preferences Experts, the only organization in North America authorized by Volodalen to teach how to identify and take advantage of motor preferences in this part of the world. To say it was mind-blowing and potentially game-changing is still greatly understating the impact that understanding your players’ motor preferences can have.
I’m not going to go into a lot of detail here, but I’m going to share some of these concepts to help you get a better feel for how learning about your players’ motor preferences can help you train them better.
One of the core concepts is that athletes can be classified into one of two groups: aerials and terrestrials. These are not black and white classifications but, as David told us, more 50 shades of gray.
So while some players may be totally aerial or terrestrial, most will fall somewhere along a spectrum in-between those two extremes.
Aerials tend to move rather light and bouncy, especially when they run. They like being up in the air, with their center of balance leaned more forward. Think of a kangaroo.

Terrestrials, as the name implies, tend to be more earthbound. Their center of balance tends to sit further back, and they pull themselves forward rather than bound forward. Think more like an elephant.
Those are two very different movement patterns. So you can see why, if you tell an aerial to spring forward when they move you’ll get great results, while telling a terrestrial to spring forward will probably not get the success you’re looking for. One is designed to do it, the other is not.
Another key factor is which side of the body favors being in extension and which side favors being in flexion. All of us have one of each, and it’s built into our DNA.
So if you have, say, a catcher who can block well to her right but struggles to get to her left, it could be her left leg is her extension leg, which is good at pushing/extending, while the right flexion leg is not so much.
There are many other motor preferences, such as a preference for red or blue, that need to be taken into consideration to develop a complete, individualized profile of a player, but you get the idea. The more you understand how their body is designed from birth to move, the better you can train them to take advantage of what they can do easily while avoiding what will be more difficult for them to do..
Now, I don’t claim to be an expert in motor preferences. While I am now certified in motor preferences use by MPE as well as Volodalen, I am still very early in this journey.

But I have already seen results within a single lesson after testing a few students and making suggestions based on the outcomes. For example, a hitter who hitting pop flies on front toss suddenly started hitting bombs after we adjusted her swing to use her motor shoulder more effectively.
I’ve also seen a pitcher improve her stability and pick up a couple of mph in a lesson after changing how she launches. Several pitching coach friends who were at the clinic are reporting similar improvements just through understanding their students’ motor preferences better.
If you are serious about helping your players become the best they can be – whatever that ceiling is – I highly recommend signing up for a Motor Preferences Experts clinic. You can find a list the upcoming dates and locations here.
I will tell you it’s not cheap. Attending a clinic is a $900 investment, although you can then attend additional clinics for a refresher at no charge, at least as of this writing. But in my opinion it is well worth the expense, especially if you plan to keep coaching or teaching for a while.
If you want to get started but can’t make it to a live clinic right now you can also do the Volodalen online course as I did. That will be a $990 cost (which cannot be applied to the cost of live clinics in case you were wondering because they are offered by separate organizations). It is not as complete as the live training, nor as valuable in practical application in my opinion, but you do get videos you can refer back to again and again.
Either way you go, however, spread that cost out over a few years, and compare it to the benefits you and your players will receive, both in terms of improving their performance and helping them prevent unnecessary injuries, and I think you’ll find as I did that it is an incredible bargain.
And you’ll better understand not only why things that work with some players don’t work with others but also how to change what you’re teaching to what WILL for those players. You can’t put a price on that.
Product Review: OnForm Video Analysis and Messaging Software

One of the most important tools a coach or instructor can have in their toolbox (and on their phone) is a video analysis app.
The ability to provide instant, visual feedback, including the ability to mark it up like John Madden diagramming a football play, is invaluable in helping players develop. As is the ability to review it later and offer more in-depth analysis.
I started many years ago with the mobile version of RightViewPro, then moved to Coaches Eye, which I’ve probably used for 10 years or more. It could be clunky at times, especially because if you wanted to be able to search for a particular player’s video later you had to manually tag each one after you shot it, but it got the job done.
Then in September I received an email from TechSmith, the creators of Coaches Eye, that they had decided to discontinue the product and would no longer be supporting it. They generously gave a one-year sunset period, but it meant I had to find a new app to use for my students.
I had played around with Hudl Technique before, but when I checked them out I discovered that product was also going away because it was being replaced by an app called OnForm, which is available on the Apple and Android platforms. I decided to check it out, and let me tell you I am very glad I did.
(At this point I think it’s important to point out that I purchased OnForm with my own money, and I am not being compensated in any way for this review nor do I get anything if you click a link or download the product. I have no affiliation with them whatsoever. I am strictly sharing my experience with the product to help you if you’re looking for a video analysis app for your own use.)
Core Usability
OnForm takes what most of us liked about Coaches Eye and similar apps and kicks it up a notch. For example, you can specify higher capture rates (up to 1080p) and shutter speeds to minimize blurring when you capture a video. Very handy, especially in the lower light conditions you typically find indoors.
Rather than storing all your videos on your device forever, OnForm lets you choose how long after you shoot them you want to keep them. After that they are stored in the cloud, where you can access them on-demand.
One of the best overall features, especially if you are a coach or instructor, is how the videos are organized. You create a folder for each player on the main page by clicking on the + button in the upper right hand corner and following the directions. You can choose whether you want to add a person for one-to-one coaching, add a team, or connect with another user who has sent you an invite code.

Once you’ve set up your first player, all the rest follow the same template for sport and role, so all you have to do is fill in the name. It just takes seconds to set someone up, but from then on you can open their folder and all the videos you shoot automatically are saved to that folder.
As someone who shoots a lot of video, sometimes in a single night, that is a huge time-saver. The videos within each folder are saved by date, and you can choose whether to share them with the player/parent automatically or just keep them to yourself. You can even import outside videos in other apps on your device, although only on a one-off basis unless you are importing them from Hudl Technique.
Live Analysis
Now let’s talk about usability. When you open the video you have a pretty standard toolset where you can mark straight lines and arrows, freehand lines and arrows, circles, squares/rectangles and even a single line that shows the degree of tilt or angle.

Additionally, there is an angle tool that not only lets you measure various angles initially but also enables you to change the angle if you did it wrong by clicking on it. Former Coaches Eye users will really appreciate that. Actually, you can do that with any of your markings but it’s particularly useful on the angle measurement tool.
You also have some interesting tools such as a stopwatch so you can measure how long it takes to execute a skill and a measurement tool that lets you mark distance. For the latter, think of measuring a hitter’s or a pitcher’s stride, or how far a bunt traveled, etc. As long as you know one reliable dimension you can mark that and OnForm will make the rest of the calculations for you.
Perhaps the coolest tool, and one they just added a couple of days ago (late November 2021 for those reading this later) is the skeleton tracking tool.
With the click of an icon OnForm will automatically mark every joint in the body and draw lines between them. Then, as you play or scrub the video, the skeleton lines will move with the player providing an unprecedented look at how how/she is moving through space. If the sequence of movements is important to you, you’re going to love this tool’s ability to display it.
Incidentally, the skeleton tracking overlay isn’t just for new videos. You can apply it to any video you’ve shot.
The toolset is rounded out by several additional capabilities, including:
- The ability to play videos through at full, 1/2, and 1/4 speed off a dropdown menu
- Two scrubbing tools – one which moves quickly through the movement, letting you go back and forth, plus a wheel that makes much finer movements so you can show subtle details
- An undo button to remove one line, circle, etc. at a time as well as a clear button to remove all markings
- A compare button that allows you to bring in a second video, whether it’s a previous video from that player or a pro example you’ve stored in a Reference Content folder, to provide a side-by-side comparison
- The ability to flip the video, which is handy if you want to, say, compare Cat Osterman or Monica Abbott to your right-handed pitcher
- Ability to trim the video to get rid of time between activities or other excess footage
- Editable titles and tags so you can mark exactly what was happening (such as which pitch a pitcher was throwing)
- Ability to edit the name, I suppose in case you got it wrong or the name changes
- Ability to save certain videos as favorites so you can find them more easily later
That’s a lot of capabilities, right? But we’re not done yet!
Recorded Analysis/Online Lessons
If you want to wait until later to analyze the video and then share the file with the player or parent, you can also do that. The Record feature gives you the option of recording the screen and live sound or just the screen.
You can pause the video in the middle or record straight through. Once it’s recorded it automatically plays a preview so you can check your work.
From there you can save the video as-is, trim the front or back, or discard it. If you’re happy with it you can share it directly through OnForm (if you’ve invited the player to join) or through email, messaging or some other app.
Pricing
Ok, now it’s time to get to the nitty-gritty. OnForm offers four different packages depending on your needs. Each comes with a one-week free trial so you can see whether it’s what you want. Be sure to double-checking pricing here since it may have changed since this blog post was written.
The first is a Free package that limits you to 10 videos in your account. If you don’t think you’ll be using it much, but want the option to shoot the occasional video, this one should work for you.
Next up is the Personal package, If you’re working with your own kids only (as opposed to coaching a team or being an instructor) this one should work for you. For $5/month or $49/year you can capture, store and analyze up to 500 videos as well as create up to 5 analysis videos in a 30-day period.
The Coach package (which is the one I have in case you’re interested) provides unlimited videos and analyses/voice over lessons for one coach, as well as allowing any invited athletes to upload unlimited videos to you for free. It also gives you the ability to create notes to go with each video and broadcast lists to reach multiple players at once. This package isn’t cheap, at $29/month or $299/year, but if you plan to use it a lot I think you’ll find it’s worth it.
Finally, OnForm offers the Team/Academy package, which includes everything in the Coach package along with the ability to create three (3) coach accounts rather than one so multiple coaches can access and use the same videos. That one is $69/month or $699/year. It’s probably best-suited to collegiate teams, large travel programs or facilities that offer teams.
My Take
So how is it in practice (no pun intended)? I think it’s tremendous, and a significant upgrade over the products I’ve used in the past.
Creating the videos and marking them up is fast, easy and reliable. They are really helpful with illustrating what is happening and what needs to be done. For pitchers I love being able to draw a single line and show the forward/backward tilt of their bodies.
As previously mentioned I love the way the videos are organized. Rather than having to come home and tag each video, they’re already in the right folders and available. I’ve even moved some videos into one of the Reference Content folders so I can easily call them up to show what famous fastpitch players do.
The analysis tools are easy to use as well, and I definitely love being able to easily discard a video and start over rather than having to wait for it to render (as I did in Coaches Eye) before I could delete one I knew went bad.
Do I wish it was cheaper? Of course, who wouldn’t? But the value is there, and OnForm is continuing to develop the product and add new features so as long as the value is there I think it’s worth paying the price.
Finally, there is their support. When I contacted them to ask why the skeleton tracking feature wasn’t showing up in my iPad they got back to me within 12 hours to explain you need an A12 chip or higher for that feature to be available.
Bummer, but at least they got back to me quickly which is great. They also have a way for users to request new features (I’m going to ask for a clock face drawing tool), and a blog to keep you up-to-date when something new is introduced.
I wholeheartedly recommend OnForm as a training tool for fastpitch softball players. As a bonus, you can use it for many other sports and activities as well, so if you have, say, a softball player and a golfer, one instance will work for both.
Check out the free one-week trial. I think you’re going to let what you find.
Book Review: Spanking the Yankees – 366 Days of Bronx Bummers

AUTHOR’S NOTE: While technically this post isn’t about fastpitch softball, I know many softball coaches, players, parents and fans are also followers of our sport’s older, slower cousin so once again I diverge slightly from the usual path to bring you what I’m sure many will find to be a fun read.
There is probably no sports franchise that is more storied than the New York Yankees. Love ’em or hate ’em (and there are plenty on both sides) you have to admit that they have long been considered the Gold Standard for success.
In fact, often the best or most dominant teams in other sports are referred to as “The New York Yankees of (FILL IN THE BLANK).”
With all that adoration/hype, it’s tempting to believe the myth that the Yankees have achieved this rarefied status by being able to avoid the missteps, boneheaded plays, under-performing superstars and other issues that plague the rest of the league.
“Spanking the Yankees – 366 Days of Bronx Bummers” by Gabriel Schechter busts that myth wide open. It turns out they’ve made just as many untimely errors, had as many failed saves and critical strikeouts, secured as many draft day and free agent busts, and suffered through as many poor management decisions (looking at you George Steinbrenner) as anyone else. They’ve just managed to win 27 World Series rings in spite of it all.
The author makes no bones about his point of view or reason for writing the book; he has hated the Yankees his entire life, and thus takes particular delight in documenting every misstep in the 318-page tome. Yet you can also detect his grudging respect for what the Yankees have accomplished since they began to play more than 100 years ago.
(Full disclosure: I am a lifelong Chicago Cubs fan, so when my Yankees-loving friend Ray Minchew complains that the Yankees haven’t won a World Series in eight years I have zero sympathy for him. That’s the perspective I come from.)
The book is actually a quick and easy read. It is set up like a journal, walking readers through a day-by-day accounting of the worst thing that happened to the Yankees on a particular day, regardless of the year. Here’s an excerpt from May 8, 1990:
The Yankees lose to the A’s for the fifth time already this season, a 5-0 pasting in Oakland. “This is tough,” admits Yankees manager Bucky Dent. “I’ve never seen anything like this.” Get used to it, Bucky. The A’s sweep all 12 games from the Yankees this season, outscoring them 62-12 in the process (0-2-0-1-0-1-0-1-1-1-2-3). On second thought, Bucky, never mind. Four weeks later, he is liberated from his Bronx bondage, ending his managing tenure with a record of 36-53. Some guy they call “Stump” takes his place, and the Yankees finish dead last in their division with a 67-95 record.
Hilarious.
This short format, by the way, makes it ideal for bathroom reading, airplanes and other travel, waiting rooms and other places where you need to be able to get into and out of it easily. Although once you get hooked you’ll probably want to keep going anyway.
Its three sections begin with Opening Day (which occurs on different days) and the regular season, followed by postseason play (with loving emphasis on World Series losses – yes the Yankees have lost more World Series than most teams have played in) and then the offseason. Anecdotes go all the way back to the days when the Yankees were known as the New York Highlanders and played at the Polo Grounds.
So by now you’re probably thinking this is a great gift for a Yankees-hater or the casual baseball fan. You might also want to pick it up to needle your Yankees-loving friend. But funny thing about that.
The Yankees fans I know have a love-hate relationship with the ballclub, and they like to wallow in the misery as much as anyone else.
Yankees fans may actually find the book cathartic, opening up old wounds and letting them once again wonder why certain players never seemed to come through in the postseason, why a particular manager couldn’t handle a bullpen very well, why management paid so much for a free agent that was a star before and after their time in New York but was a total bust while wearing pinstripes and about dozens of other issues that have made their blood boil through the years.
If you love baseball, love or hate the Yankees, or just want a quick, fun read to take your mind off of whatever is bothering you in your real life, give “Spanking the Yankees” a look. I think you’ll find it’s time well-spent.
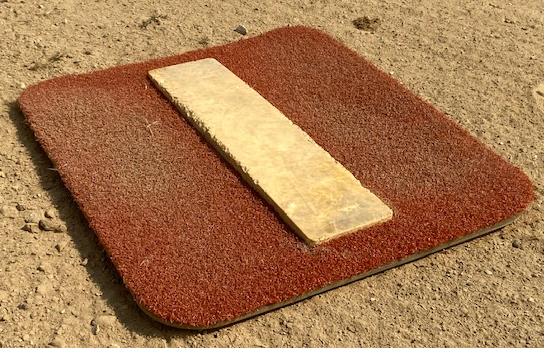
Product Review: Portolite Short Spiked Softball Mat
One of the things I have always found challenging when working with pitchers is getting a good surface to work from out on the field.
In a gym or practice facility you have a large selection of roll-up mats. But if there isn’t a permanent pitcher’s plate out on the field, what most people end up doing is throwing down a hunk of rubber purchased at the local sporting goods store. Or going without.
With those throw-down types of rubbers you either have to be willing to pound them in with stakes or nails and pull them out again or skip the stakes entirely. If you pound them in, the stakes that come with them last about three times (less if you’re trying to pound them into hard ground). Then you have to purchase long nails at the hardware store with big washers to keep them from going through the rubber.
Need to change distances to accommodate pitchers of different ages? You have to pull the stakes or nails up to move the rubber, then go through the entire process again.
Of course, if you decide not to stake the rubber down at all it will go slipping and sliding from under the pitcher’s feet, making matters worse, not better. Eventually the pitcher will probably just kick it out of the way.
That’s why I was excited to come across the Portolite company when I was helping at a Rick Pauly clinic in Minnesota put on by JohnnyO. Johnny had a couple of their products there, and said they had a few different models for softball, including one with short spikes on it.

This was the picture that convinced me it could work on dirt.
When I got home I checked it out and decided to give it a try. I needed one anyway for some indoor work on a turf field so figured that alone would be worth it. But I was really looking forward to trying it on the dusty fields I use during the summer.
First thing I wondered was would the spikes actually catch in the ground and hold it in place? The short spike mat isn’t cheap, so I was definitely rolling the dice on that count.
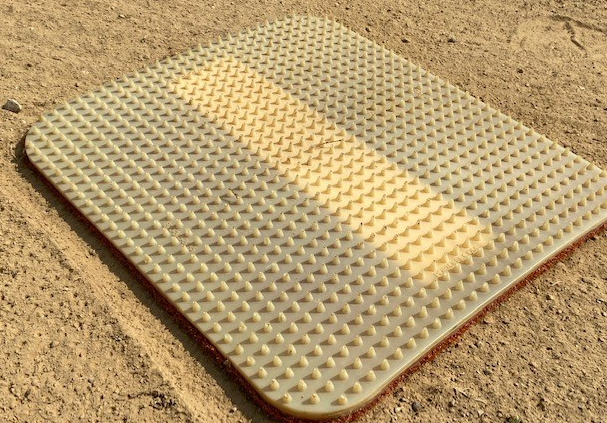
The website shows the bottom is green but this is how mine looks.
I am happy to report, however, that it actually holds pretty well, especially if the field isn’t rock-hard due to a lack of rain. Hard to say if all the little rubber (or whatever material they are) spikes catch, but certainly enough of them do to hold it in place even with strong, powerful pitchers. As they push in, the spikes dig in.
I was also concerned about how it would hold up with pitchers using metal cleats as many of my students do. As you can see, the mat isn’t necessarily pretty after a month’s worth of use, but I don’t need it for photographs. It actually seems to be holding up pretty well. I expect to get a few years’ worth of use out of it.

The edges of the rubber are a bit chewed up but the mat itself is holding up well.
Using a pitching mat like this one has some added benefits. For example, it’s easy to pick it up and move it when I have different age students come in. In just a few seconds I can go from being set up for a 10U pitcher at 35 feet to an 18U pitcher at 43.
This portability also helps in terms of giving my students a good overall surface to use.
One of the fields I camp out on regularly isn’t particularly well-designed or maintained. After a few lessons there can be a big hole at the permanent pitcher’s plate, with a trough leading away from it. (I doubt there are any bricks or anything else you’re supposed to use to stabilize the area.)
When that happens it can get pretty tough to pitch straight from the pitcher’s plate. I try to fill in the area by raking it out, but that doesn’t do a whole lot of good, especially when it might be a few weeks before it’s dragged again.
With the Portolite mat, however, I can either move the pitcher forward or off to the side where the ground is less worn. She gets a flatter surface to pitch from so she doesn’t have to worry about catching herself in someone else’s divot. Or trough.
And when I’m done for the day I can just pick it up, knock the dust off as best I can and throw it in the trunk for the next day.
The website says it can be used on turf, dirt or grass. I’ve done all three and can attest that it works equally well on all.
Again it’s not cheap at $235. But if you’re looking for a solution that helps provide a stable surface for your pitcher(s) in an easy-to-use, very portable format, be sure to check it out. I think you’ll be as pleased as I am.
Also available at:
Product Review: Pocket Radar Smart Display

Pocket Radar devices have become pretty commonplace in the fastpitch softball world. You see them everywhere, at the ball park, in practice facilities, and in social media photos as grinning pitchers proudly display their latest speed achievements.
The handy devices are not only easy to carry around (and not as obtrusive to use as a standard radar gun since they can easily be mistaken for a mobile phone) but priced within reach of most programs, coaches and bucket parents.
The current top of the line is the Pocket Radar Smart Coach, which I reviewed back in 2018 when it first came out. One of the major benefits is that the free app that comes with it lets you set up your Smart Coach to capture each pitch (in Continuous mode) and then display the results on a phone or tablet via Bluetooth so the pitcher can get instant, accurate feedback on each pitch so she can measure her progress.
That works great indoors. But it might be a little dicier out on an actual field. The bright sunlight on a super hot day might make the display on an iPad or other tablet tough to read, and it could cause the tablet to overheat and shut down.
There is a solution, however: the Pocket Radar Smart Display. It delivers a large, very bright speed readout of up to three digits that the manufacturer says can be read from 100 feet away in bright sunlight. It looks very similar to the types of displays used on scoreboards.

Beating a personal best she’d set just a few pitches before.
I’ve been using one for about a month and so far it has been great. I haven’t had a chance to try it outdoors yet, but based on what I’ve seen indoors I expect it to be plenty readable once the weather breaks and we can move outside again.
Product description
The Smart Display is made of durable plastic, and its compact size (roughly 10.5 inches W x 9 inches H x 2.5 inches deep) is easy to carry, transport and store. In addition to the digital display, the front side has indicator lights showing whether speed is being measured in miles or kilometers per hour (user selectable).
There is a combination carry and mounting handle/kick back stand that locks in place to create a 45 degree tilt as well as sitting straight above the unit or folding out of the way underneath.

The left side recess includes (from top) a power button, a functions button, the power connection socket and a USB socket to connect the Smart Display to the Smart Coach.
The function button offers two menus – a basic and advanced – giving you more control over the Smart Display. For example, if you tap the black button once you can bring up the last recorded speed so you can capture a photo of it. The Smart Display stores the last 25 speeds recorded so you can wait a few pitches to see if the pitcher can go even higher (more on that later).

This was her second new high of the night.
Holding the black button down for two seconds lets you check the life of the batteries if you are using alkaline C-cell batteries.
The advanced menu gives you even more options, such as setting the Smart Display to measure miles or kilometers per hour, setting the auto-off timer, adjusting the brightness and more. To access it you simply hold the red (power) and black (function) button in at the same time for more than two seconds.
Set-up instructions, and instructions on how to access the menus, are printed on the back of the unit for extra convenience. Good news for those who don’t want to carry the instruction manual with them.
(Incidentally, while I primarily use the Smart Coach and Smart Display to measure pitch speeds, you can also set it up to measure ball exit speed off the tee for hitters. So if you’re a team coach wondering if it’s worth it for two or three pitchers, that is something else to keep in mind when determining the value.)
Basic set-up
The set-up for the Pocket Radar Smart Display is pretty simple. You connect the Smart Coach to the Smart Display using a cable with a USB connector on one side and a mini connector on the radar unit side.
The USB side connects to the Smart Display, and then you plug in the power source, which powers both the Smart Display and the Smart Coach. For power, you can either use a power bank (the type you use to power a mobile phone or tablet when the battery is running low) or use the supplied cable and plug to plug directly into an AC power source.
You can also insert four C-cell batteries into the Smart Display but I don’t recommend that if you plan to use the radar to capture every pitch. You’ll end up spending a fortune on batteries if they’re not rechargeable.
If you need portable power, use a power bank – you can get several hours of performance out of it depending on the unit you use. If you get a cylindrical power bank you can insert it into the compartment for the C cell batteries and run a cable out to the input, keeping the power source more secure.
Once you have all the connections you have a couple of additional options. If you are outdoors and have the Smart Coach set up safely on a tripod behind a backstop, you can also mount the Smart Display to the fence using the two supplied carabiner clips, or hang it below the tripod.
If you can’t mount the Smart Display to or behind a protective backstop – for example, when you are indoors in a net batting cage – you can use an extension USB cable to run the display out to the side and set it on the ground where it is unlikely to take a direct hit. The built-in kick-back handle lets you tilt it up for easier reading as well as greater stability. Fortunately, Pocket Radar offers a 50 foot cable as a separately purchased accessory if you need it.
That’s actually what I have been using indoors and so far it has worked very well. It seems to be durable enough to handle the constant rolling and unrolling required if you have to set it up and take it down every day as I do.
It’s not quite as convenient as the Bluetooth connection with a mobile phone or tablet, but you also don’t have to worry about interference. It also frees your phone or tablet for other duties, such as taking video, measuring spin rates with a Bluetooth-enabled ball and app or playing music.
That said, I’m told the good folks at Pocket Radar are looking into the possibility of making it Bluetooth-enabled in the future. If it comes true, hopefully they will offer either a retrofit kit or a buyback option as they have with other products.
With everything in place, all that’s left is to turn it on using the red button on the side of the Smart Display, push the white button on the Smart Coach to wake it up and press and hold the Mode button on the Smart Coach to set it to continuous mode. That’s it – you’re all set to start capturing pitches.
Instant feedback
Each time the pitcher throws a pitch, the speed is shown on the digital display in big, bright red numbers. The numbers remain visible for a few seconds, then turn off. At that point you’re ready to capture the next pitch.
One of the best features of the Smart Display is that if the pitcher hits a new speed high, you can use the recall function to bring that number back so you can take a photo as I did here. While showing the numbers on the Smart Coach itself is nice, there’s nothing like showing them in big, bright numbers to give the pitcher an extra sense of pride.
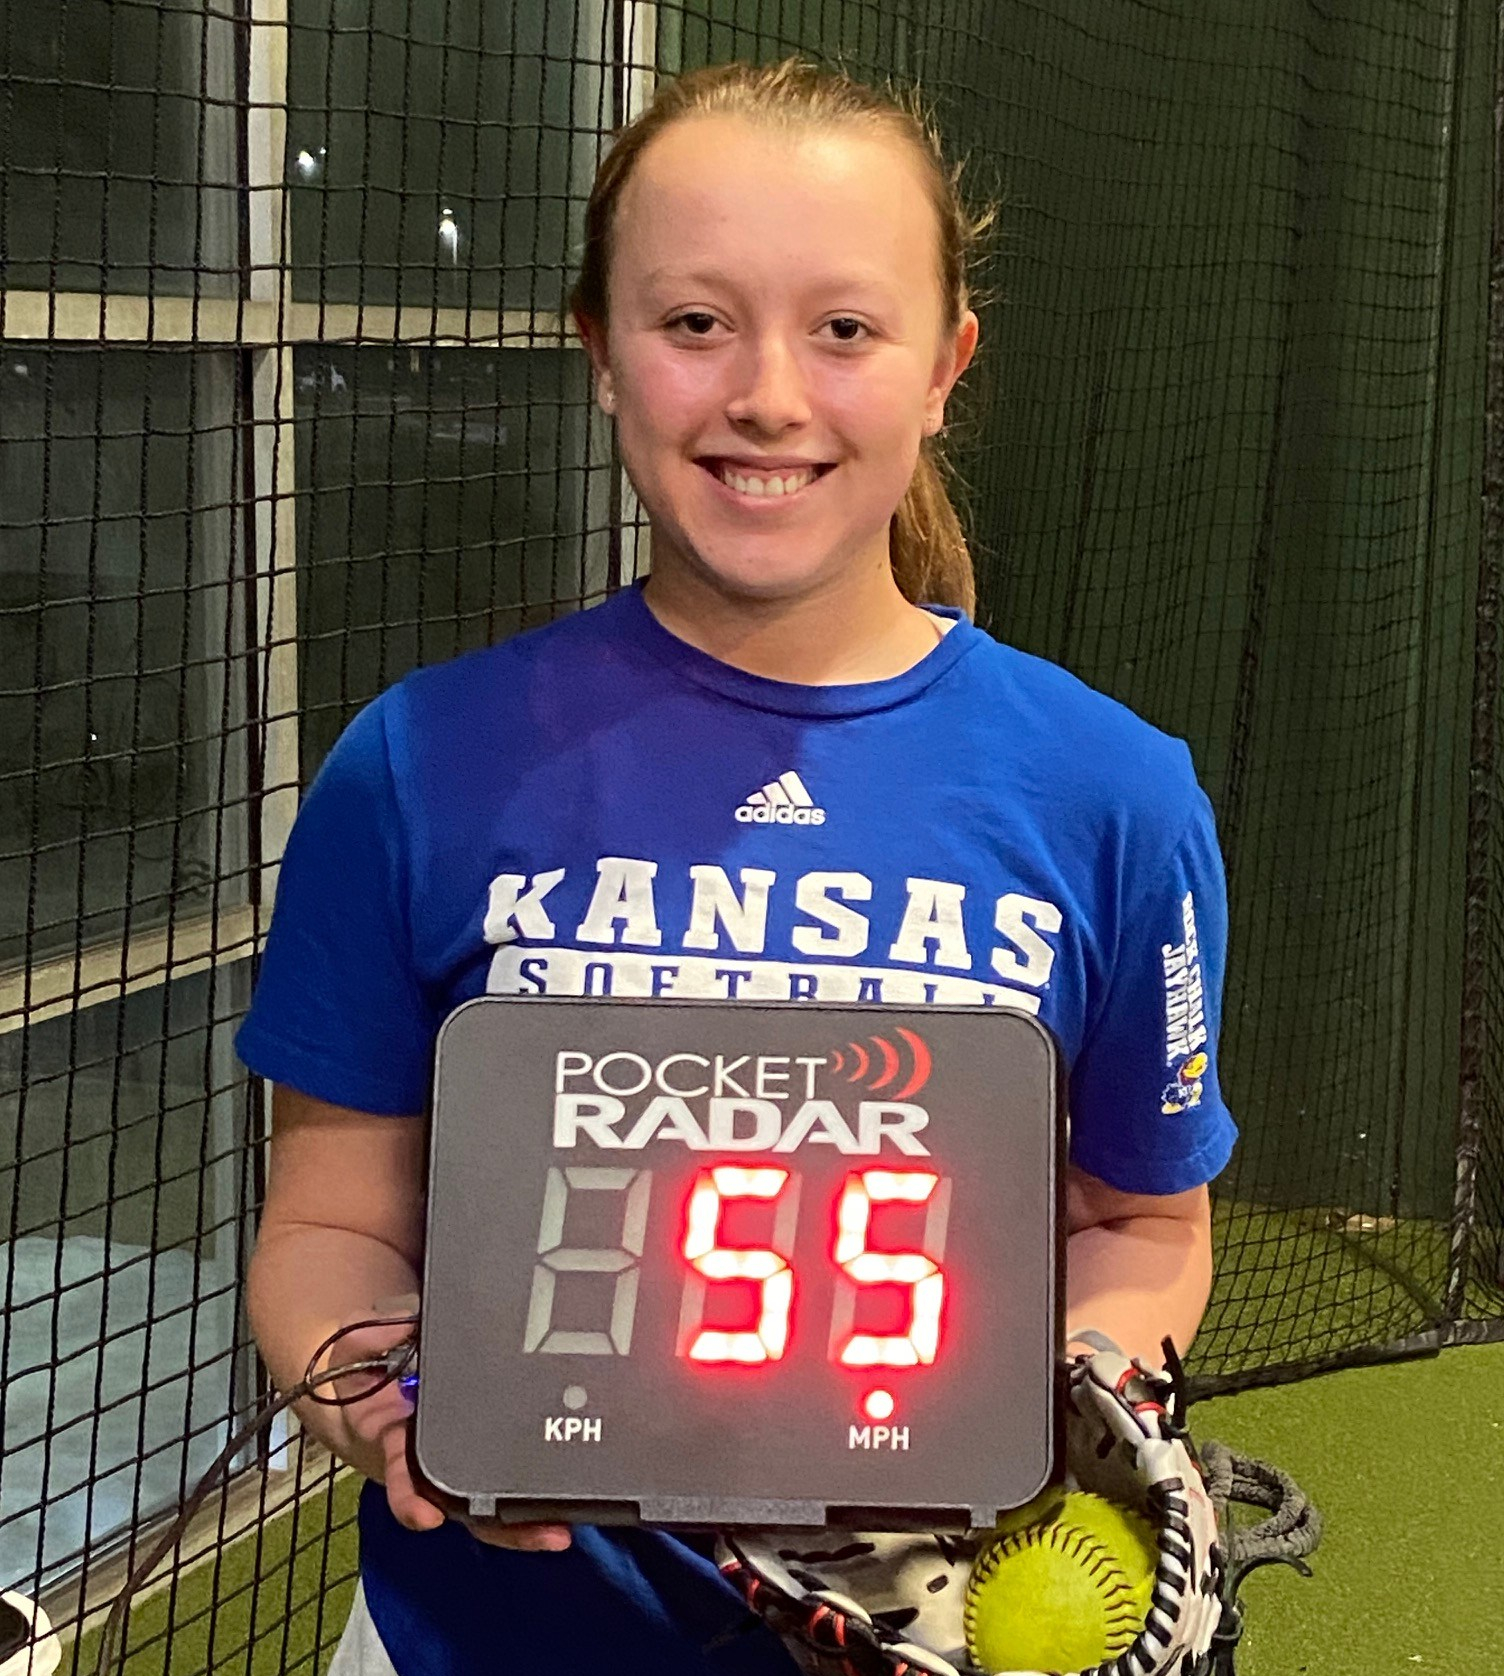
Nothing like the pride of accomplishment.
The display will hold for about a minute, I think, which should be ample time to get the photo. But if not, just go back and pull it up again.
Having this instant, continuous feedback, by the way, has had a positive effect on my students as I wrote in another blog post. Seeing where they are tends to make them push themselves to achieve higher speeds. Having the numbers in a big, bright display that anyone in the area can see adds a bit of accountability too. No one wants to be seen as slacking off or underachieving when others are watching.
Watch the (outside) nickle hardware
I will admit I was a bit concerned when I was first using the Smart Display because it seemed like it was prone to lose power and shut down any time I had a student pick it up to take a photo. What I discovered, however, that it wasn’t the Smart Display that was the problem.
It was actually the power connection cable from my power block to the unit. It apparently was cheap, and after not much use broke somewhere in the middle. If I set it just right it would work, but if I moved it even slightly it didn’t.
Once I started using a new cable the problem went away. I share that story so you don’t freak out if you have a similar issue. Check the nickle hardware first, especially the power block and cable you probably picked up for free at a trade show or as a gift for attending a presentation. You’ll save yourself a lot of embarrassment.
Cost
By now you’re probably wondering what all of this wonderfulness costs. It’s not cheap. The Smart Display retails for $499.99 on the Pocket Radar website, and a quick search showed that price holding across the Internet so it’s definitely not for the casual user.
(There was one exception, which showed the Pro Radar System and Smart Display for $69.99 but you probably want to steer clear of that. If it sounds too good to be true it probably is.)
There is also a bundle that includes the Smart Coach and Smart Display for $799.99. That might be worthwhile if you don’t own the Smart Coach yet. But if you already own the radar unit itself, you’re better off purchasing the Smart Display separately.
Final word
As you can probably tell, I really like the Pocket Radar Smart Display. I can keep it and all the accessories in my car, which means I don’t have to remember to charge and bring my iPad to every lesson – an issue I had a couple of times, which was disappointing for both myself and my students.
I also don’t have the risk of my iPad falling out of bag or “walking away” in a crowded facility if someone sees me tucking it away after lessons. It’s also a less attractive target to be stolen since it basically has one function and you need a Smart Coach to operate it.
More importantly, the bright display and the mounting options will be a definite plus when I am giving lessons outside. I wasn’t relishing the idea of setting my iPad down in the dirt. Now I won’t have to.
For facilities, pitching coaches, programs with multiple teams or even team coaches who are serious about measuring performance and holding players accountable, the Smart Display is a great addition to the Smart Coach. It’s also a smart investment in your players’ futures.
CORRECTION: I originally said you couldn’t use the Smart Display and the Smart Coach app at the same time, but I was incorrect about that. You can. When I tried it I forgot I had to re-pair the Smart Coach with my iPhone because it had previously been paired to my iPad. So you if you want to capture the history, or shoot a video with the embedded speed on it, or use the audible announcement of the speed, you CAN do that while running the Smart Display. This review has been updated to reflect the new (to me) information.
Product Review: The Softball Rope Trainer
It doesn’t take too much time going through Life in the Fastpitch Lane to see that I am pretty fanatical about good throwing mechanics. I definitely feel overhand throwing is one of the most under-taught skills in the game, which is a shame because it’s such a big part of the game (unless you have a pitcher who strikes out 18 hitters a game, every game).
So that’s why I was excited to receive a new (to me) product to test – The Softball ROPE Trainer by Perfect Pitch and Throw. According to the manufacturer it is designed to help softball (and baseball) players learn the proper mechanics for a powerful, strong and safe throw by unlocking the joints in the proper sequence. From their website:
“Using The ROPE Trainer allows players to work the throwing muscles in all parts of the kinetic chain. Using The ROPE Trainer optimizes the mechanics of the throwing sequence by building the muscles and joints used during the throwing process. Over time, using The ROPE Trainer will allow for better muscle memory, improved strength and endurance without the excessive stress caused by releasing the ball.”
You can read more about the theory behind it and how it helps prevent injuries here.
The basic design is fairly straightforward. It’s basically a softball with a plug system that lets you attach one or two sets of ropes. By focusing on getting the ropes to work  properly (and not smack the player on the head, legs or other body parts), The Rope Trainer helps players find the right path to slot their arms and follow-through properly.
You can add more resistance by using both sets of ropes to create more of a strength workout, although the grip will then not be the four-seam grip most players are used to. No worries, though. You’re not actually going to throw the ball anyway.
The manufacturer positions it as an upgrade over the old “towel drill,” where a player holds a small towel and goes through the throwing motion with the same goal in mind. In fact, here’s an article that tests The ROPE Trainer versus the towel drill. They tested the baseball version rather than the softball version, but I’m sure it’s the same.
One of the big differences in my eyes is that the ropes can swing around more than a towel, so the player has to be more precise in her arm and hand path to get the right results.
Ok, sounds good in theory. How did it work in practice?
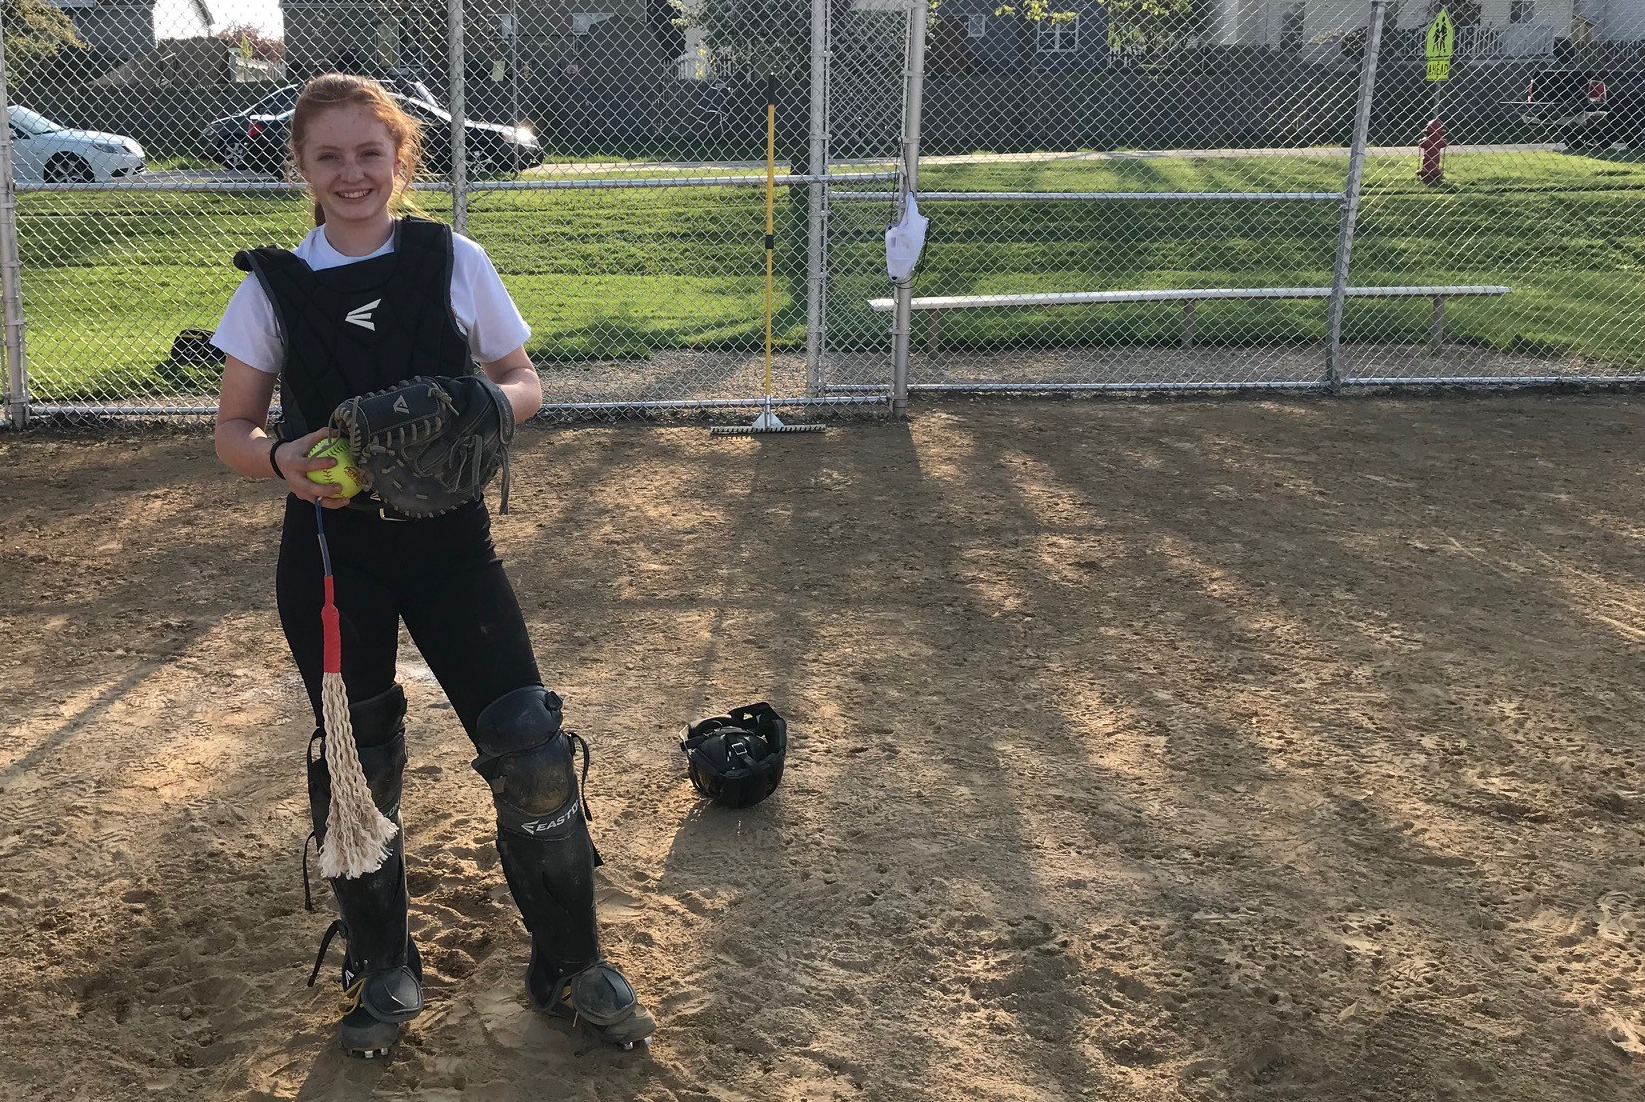
The first girl I had try it was a terrific 14U catcher named Liv. She wanted to learn how to throw from her knees, so it seemed like the perfect opportunity to check it out.
One of the big issues with catchers, especially young ones, learning to throw from their knees is that they tend to only use their arms. They don’t get into a good position to use their shoulders, torsos, glutes, and other big muscles, and they have a big tendency not to follow through after throwing.
So I put on one of the sets of ropes, handed Liv the ball, and had her get into a runners on base stance. When I said “go” she reacted, getting into position and using The Rope Trainer as if she was actually making the throw.
As I said, Liv is awesome so after a couple of attempts she got the hang of getting the ropes to whip through to her left side at the end. Here’s a video of her as she’s using it:
Then we switched her to an actual ball. She immediately was able to make the throw with good juice on the ball, and with great accuracy too. Most important, she was using a strong throwing motion that will protect her arm and shoulder.
To give you an idea of how strong her throw was, this is what happened to her mom’s wedding ring after receiving a few at second then at first. Oops. 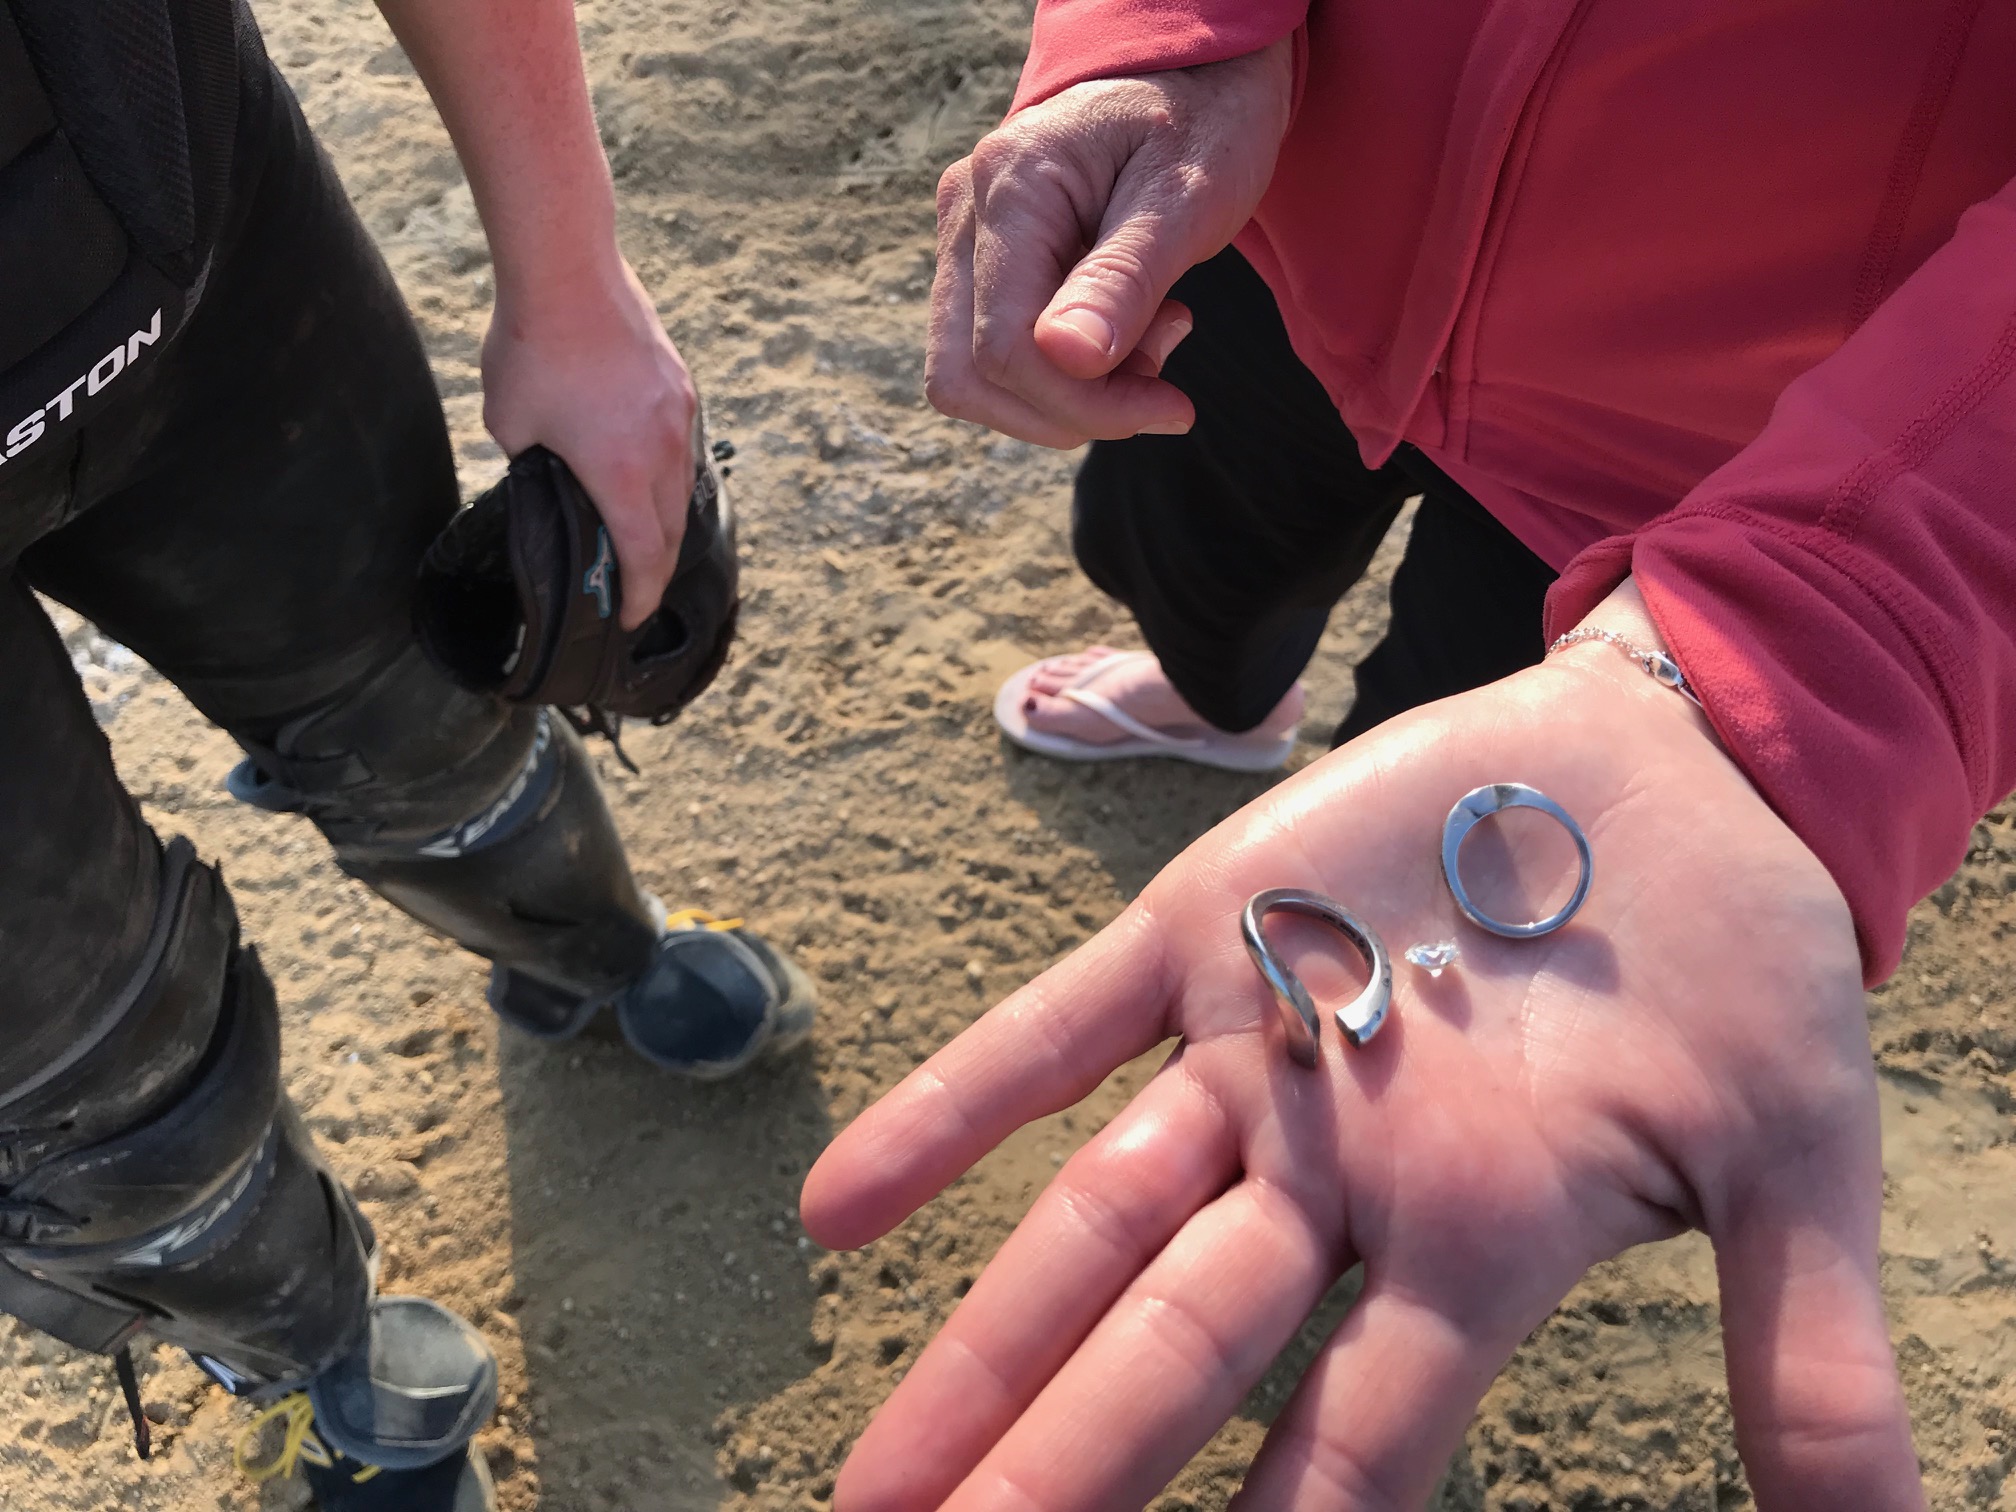
Of course, it’s easy to get something to work when you have an excellent player using it. So for another test I went the other way.
I took a younger girl (who shall remain nameless) who did not have a particularly good throwing motion and had her try The Softball ROPE Trainer as well. While the results weren’t quite as instantaneous, she also showed improvement.
This particular girl was doing the classic “throw like a girl” of dropping her elbow below her shoulder and just sort of shoving the ball forward with her arm.
(NOTE: Don’t even bother telling me how horrible I am to use the phrase “throw like a girl” and wonder how such a nasty misogynist could ever work with female athletes. I encourage my students to throw like softball players, and will put them up against any male player their age – or any dad who doesn’t think girls can throw hard. So chill.)
After working with The Softball ROPE Trainer for about five minutes she was doing better with her overhand throws. I doubt that little session was permanent, but I wanted to see if it would make a difference.
I believe it did, and that with repetition at home and/or practice someone with poor throwing mechanics could re-learn how to throw properly, most likely within 2-4 weeks with regular work.
The other nice thing about The Softball ROPE Trainer is that it doesn’t cost very much. You can purchase it direct from the manufacturer for just $67.49. I know, weird price, right?
For that money you get the ball, two rope sets (I think – the website says one but mine came with two), instructions and a nice drawstring bag to hold it all. If you wear out the ball or one of the rope sets you can purchase new ones as well, which is always nice.
If you have or know players with poor throwing mechanics, or have someone with good mechanics who want to get better, give The Softball ROPE Trainer a try.
Oh, and in case you’re wondering, I don’t know how it is for fastpitch pitching yet. That’s next on my list to try. Seems like if you have mechanics that focus on whipping the ball through the release zone instead of pushing it The Softball ROPE Trainer might work. We’ll see.
If it works, I’ll do another post on that. If not, I’ll update this one.