Blog Archives
Product Review: Fieldy AI Notetaker
Let me start this post by sharing that I have always had a tremendous memory. It’s nothing I had to work at either – from the time I was young until now I just have had an ability to pull up random facts and information on demand.
It’s what allowed me to score highly in tests in school (including those national fill-in-the-little-dots tests) and to absolutely slay in Trivial Pursuit, to the point where our extended family quit playing entirely because I could not only answer almost all of my own questions but all of their too. Winning through intimidation, baby!
But even I could get confused at times after a long day of lessons about what we worked on with a specific student, especially if I had two girls who were similar. I would know we did X; I just wasn’t sure whether it was with Felicia or Tiffany.

That’s why, when I started seeing ads for apps and devices that would listen in on my lessons and create a transcript along with an AI-driven summary of said transcript, I was intrigued. I knew some of my pitching coach friends had already made the leap and seemed to like it, but I still hesitated before finally pulling the trigger, afraid I might choose one that didn’t do what I needed it to do or quite frankly would be a pain to use in the way I wanted to use it post-lesson.
But as you can tell, or if you’re a regular listener to the From the Coach’s Mouth podcast where I talked about it on this episode, I went ahead anyway and got one – specifically the Fieldy AI Note Taker 3, the latest model from Fieldy. Mostly I got it because of those pitching coach friends who said they all loved it.
And in case you were wondering, I bought it myself and am not receiving any promotional or other consideration for this product review. It’s strictly me sharing something I am finding valuable.
The Basics
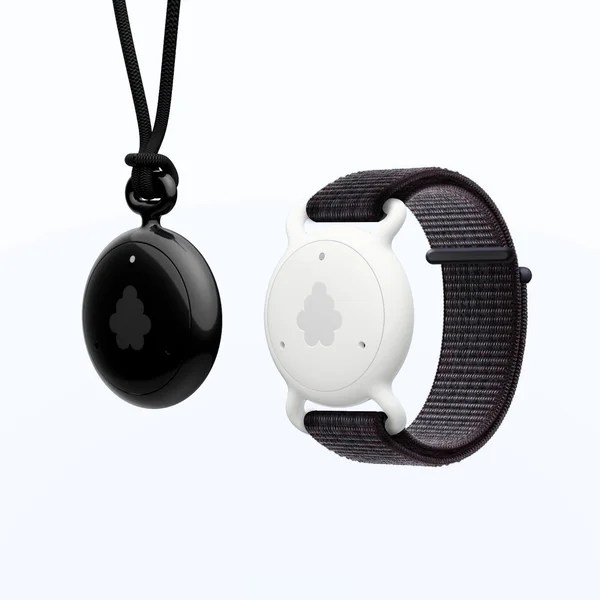
So what is Fieldy and how does it work? Fieldy is a small wearable device that you can wear in a variety of ways.
It comes with a small elastic band that you can wear around your neck, inside or outside of your shirt (I usually wear it outside), but you can also purchase a separate watch band so you can wear it on your arm. Since I already wear an Apple watch I’ve opted for the original neck band.
The neck band itself is held together by magnets so it’s easy to slip on and off. The device itself is quite small so you don’t really notice you have it on – at least I don’t. That also makes it easy to store in my car between lessons, at least while the temperatures are not at the extremes.
You also have to download their app (no surprise there) but it’s free and easy to use. More on that in a bit.
Like any Bluetooth device you first have to pair it with your phone or tablet for optimal performance. While it can record up to 3 hours locally, it’s better to pair it to a device with more storage capacity, especially if you have a long day ahead.
Once your Fieldy is paired you can train it to recognize your voice in about 5 minutes. That makes it easier when you’re looking back on conversations to tell who was speaking, at least for yourself.
Then, when you’re ready to use it, you just click the front of the unit and it starts recording. You’ll hear a single beep to confirm it started, but if you’re still not sure (especially early on) you can also look at the front to see a tiny LED; if it’s on, you’re good to go.
You can also confirm it’s running by checking the app on your phone. It will show whether it’s recording, and you can also use the app to start and stop recording.
When you’re done, you can either let it keep going to capture more conversations down the road or turn it off by clicking the button again if you want to fully separate the conversations. Pretty simple.
Transcription Capabilities and Summary
Once you start recording, the Fieldy listens in and creates a full transcription of everything that was said, separated by speaker – although that means unless you designate names it just says Speaker 1, Speaker 2, etc. The transcription can be a little wonky at times like any AI transcription, especially if you’re using words or concepts that are more specific to fastpitch, but overall it’s solid and good enough to get the gist of what was said.
The real value, though, is the summary it creates. Fieldy comes with several built-in summary templates that are oriented toward various uses, such as a business meeting, a phone call, a lecture, or even a casual conversation.
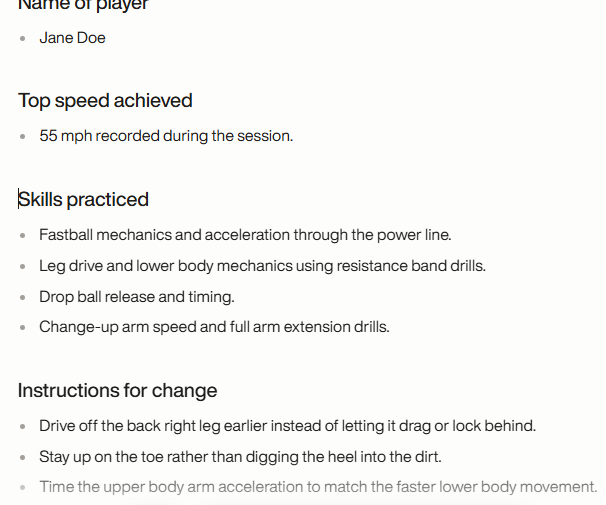
The template then takes the same basic information and organizes it for you in a way that it thinks makes the most sense for how you plan to use it.
But you can also create your own custom templates, either from scratch or by modifying an existing template, and save it under whatever name you choose. That way it’s putting the information you need right up front for you.
For example, my Softball Lessons template put’s the student’s name right up front so I know whose lesson it was (some of the phonetic spellings it comes up with are hilarious) and the highest pitch speed achieved if the lesson was with a pitcher. If it’s a hitting lesson, that section is left blank.
Of course, in order to populate that part of the summary you first have to announce what the highest speed has been so far; it’s not a mind reader. But as long as you remember to do that it will capture that information and put it up-front for me.
The same with anything else. One of my favorite parts of the summary is when it talks about the general atmosphere of the lesson.
I don’t really use that part but it is funny to look back and see the conversation was lighthearted and casual, or that the dad and I were discussing what TV shows we’re watching. So definitely be careful with what you say out loud.
In case you’re wondering, Fieldy’s website says it supports more than 100 languages, so if English isn’t your first language, or the one you use at practice, no worries. You’re covered.
And, since it’s great for overall note taking, if you want to give it to your daughter to use while she’s in school, there’s another justification for buying one (in case you need to convince a spouse you have to have it).
How I Use It
While I could leave it running throughout the entire time I’m doing lessons – Fieldy is good about figuring out when one lesson ends and another begins – I usually turn it on before each lesson and off at the end. That way each one is separated and I can be sure the information or instruction it captured is specific to each student.
As mentioned earlier, you have to be careful to spell out the information you want captured. For example, you can’t just say “Bring your arm to here” if you want to know exactly what you said.
Instead, you have to say, “Bring your arm to your hip” or “Keep your hands near your back shoulder.” It takes a little getting used to since a lot of instruction can be visual, but with a little time you’ll get used to it. I did.
When all my lessons are done and I’m ready to create my notes for the day, I open my PC and review the summaries on the desktop app. I have kept student notes in an Excel spreadsheet for a long time and like that way of organizing them, so I then have the task of moving key notes from the Fieldy app to the spreadsheet.
I would do this anyway, so I’m finding it to be a timesaver. I no longer have to ponder what was said and create everything from scratch. I usually write one or two lines freehand, and then start to copy and paste from Fieldy to Excel. Fieldy’s summaries are bulleted to I have to do a little manipulation to get the notes the way I want them, but it doesn’t take much work.
I can pick and choose selectively from the summary to keep it a little shorter, and I can also use the summary as a prompt to write my own notes if I want to organize the information a little differently or add other thoughts or reminders for next lesson. It’s all pretty simple and seamless.
My template also creates a list of Next Steps, which are good reminders of things I need to do, such as create a corrective exercise program for a player or apply a particular drill in the next lesson. As long as it’s said out loud it will be in the list. It’s also good for reminders to players of things to work on until the next lesson.
Once I’m done using the summary I usually delete the whole conversation. That way I don’t have to scroll through a bunch of old ones to get to the ones from that day. If you’re doing verbatim cut-and-paste of the transcripts or summaries that makes even more sense.
Other Use Cases
While I’ve been describing how I use Fieldy as a private coach, it makes sense for team coaches and parents as well. Maybe even moreso for team coaches because there is typically a lot more going on in a team practice with multiple players than in individual or even group lessons.
A team coach can run an entire practice as a single Fieldy session, with commentary about how particular drills are going, events that happened during practice, things to work on at the next practice, etc. If you attach a name to it you can also give yourself reminders to work on a particular skill with a particular player, send a follow-up about something, or plan ahead for the next practice.
Parents can use it at lessons to use as reminders of what their daughters should be working on during the week based on the coaching. If they stay for team practices they can make notes about what was worked on and what their daughter needs to work on based on that. They can even wear them at games if they want to create a quick list of how individual at-bats went or whether the ball and strike counts in the score book/GameChanger match up with what they saw on the field.
Fieldy is great for summarizing Zoom calls too, whether for fastpitch softball or business uses. I recently recorded a Zoom call with just the PC app (no wearable device), and it created a pretty good summary of everything that was talked about. That can come in handy if you’re trying to remember a particular point and don’t want to scan through an hour-long Zoom to find it.
Battery Life
I’ve been amazed at how much battery life the little Fieldy device has. While my lesson days haven’t been as long as usual due to a lot of my students doing school sports (love those multi-sport athletes) and the light fading at about 6:45 right now, I’ve been able to go for a week between recharges, and even then there was 30-40% battery life still available.

That may change once my lesson days get longer again in the winter, but even then I expect to get about a week’s worth of captures before it needs a recharge. The Fieldy comes with its own USB cable, or you can use one you already have lying around.
Cost
So, you’re thinking, that all sounds wonderful. But how much does it cost?
That’s a two-part answer. The first part is the Fieldy device itself.
I think it can vary from time to time, but right now as I write this a single Fieldy is $129. If you buy more than one (say, for two parents or a full coaching staff) the cost per unit is even less.
Here’s the thing, though. The basic unit only comes with 150 transcription minutes per month. That’s 2.5 hours for the math-challenged.
Clearly, that wasn’t enough for me doing lessons pretty much every day for several hours at a time, and it likely won’t be for coaches running more than one practice a week.
The good news is you can get unlimited minutes for a subscription fee of $15.99 per month if you subscribe for a full year, or $19.99 per month if you go month by month. I’m pretty sure I paid for the whole year up front and saved a little extra over the full year but paid per month plan. But I couldn’t confirm that on their website so be sure to check it out before you assume anything.
Wrapping It Up
So there you have it. I wasn’t sure if it was something I needed at first, but the more I use my Fieldy the more I’m glad I made the investment.
If capturing what happened at practice, at a game, or at a lesson accurately and completely is important to you, definitely give Fieldy a look.
Is it better than other AI note taking devices or apps? I don’t know, I haven’t tried them. But it sure does everything I need it to do, and I’ve only explored the basics.
If you have a different recommendation, be sure to let us know in the comments, especially if yours does something that wasn’t mentioned here.
Product Review: Pocket Radar Smart Display

Pocket Radar devices have become pretty commonplace in the fastpitch softball world. You see them everywhere, at the ball park, in practice facilities, and in social media photos as grinning pitchers proudly display their latest speed achievements.
The handy devices are not only easy to carry around (and not as obtrusive to use as a standard radar gun since they can easily be mistaken for a mobile phone) but priced within reach of most programs, coaches and bucket parents.
The current top of the line is the Pocket Radar Smart Coach, which I reviewed back in 2018 when it first came out. One of the major benefits is that the free app that comes with it lets you set up your Smart Coach to capture each pitch (in Continuous mode) and then display the results on a phone or tablet via Bluetooth so the pitcher can get instant, accurate feedback on each pitch so she can measure her progress.
That works great indoors. But it might be a little dicier out on an actual field. The bright sunlight on a super hot day might make the display on an iPad or other tablet tough to read, and it could cause the tablet to overheat and shut down.
There is a solution, however: the Pocket Radar Smart Display. It delivers a large, very bright speed readout of up to three digits that the manufacturer says can be read from 100 feet away in bright sunlight. It looks very similar to the types of displays used on scoreboards.

Beating a personal best she’d set just a few pitches before.
I’ve been using one for about a month and so far it has been great. I haven’t had a chance to try it outdoors yet, but based on what I’ve seen indoors I expect it to be plenty readable once the weather breaks and we can move outside again.
Product description
The Smart Display is made of durable plastic, and its compact size (roughly 10.5 inches W x 9 inches H x 2.5 inches deep) is easy to carry, transport and store. In addition to the digital display, the front side has indicator lights showing whether speed is being measured in miles or kilometers per hour (user selectable).
There is a combination carry and mounting handle/kick back stand that locks in place to create a 45 degree tilt as well as sitting straight above the unit or folding out of the way underneath.

The left side recess includes (from top) a power button, a functions button, the power connection socket and a USB socket to connect the Smart Display to the Smart Coach.
The function button offers two menus – a basic and advanced – giving you more control over the Smart Display. For example, if you tap the black button once you can bring up the last recorded speed so you can capture a photo of it. The Smart Display stores the last 25 speeds recorded so you can wait a few pitches to see if the pitcher can go even higher (more on that later).

This was her second new high of the night.
Holding the black button down for two seconds lets you check the life of the batteries if you are using alkaline C-cell batteries.
The advanced menu gives you even more options, such as setting the Smart Display to measure miles or kilometers per hour, setting the auto-off timer, adjusting the brightness and more. To access it you simply hold the red (power) and black (function) button in at the same time for more than two seconds.
Set-up instructions, and instructions on how to access the menus, are printed on the back of the unit for extra convenience. Good news for those who don’t want to carry the instruction manual with them.
(Incidentally, while I primarily use the Smart Coach and Smart Display to measure pitch speeds, you can also set it up to measure ball exit speed off the tee for hitters. So if you’re a team coach wondering if it’s worth it for two or three pitchers, that is something else to keep in mind when determining the value.)
Basic set-up
The set-up for the Pocket Radar Smart Display is pretty simple. You connect the Smart Coach to the Smart Display using a cable with a USB connector on one side and a mini connector on the radar unit side.
The USB side connects to the Smart Display, and then you plug in the power source, which powers both the Smart Display and the Smart Coach. For power, you can either use a power bank (the type you use to power a mobile phone or tablet when the battery is running low) or use the supplied cable and plug to plug directly into an AC power source.
You can also insert four C-cell batteries into the Smart Display but I don’t recommend that if you plan to use the radar to capture every pitch. You’ll end up spending a fortune on batteries if they’re not rechargeable.
If you need portable power, use a power bank – you can get several hours of performance out of it depending on the unit you use. If you get a cylindrical power bank you can insert it into the compartment for the C cell batteries and run a cable out to the input, keeping the power source more secure.
Once you have all the connections you have a couple of additional options. If you are outdoors and have the Smart Coach set up safely on a tripod behind a backstop, you can also mount the Smart Display to the fence using the two supplied carabiner clips, or hang it below the tripod.
If you can’t mount the Smart Display to or behind a protective backstop – for example, when you are indoors in a net batting cage – you can use an extension USB cable to run the display out to the side and set it on the ground where it is unlikely to take a direct hit. The built-in kick-back handle lets you tilt it up for easier reading as well as greater stability. Fortunately, Pocket Radar offers a 50 foot cable as a separately purchased accessory if you need it.
That’s actually what I have been using indoors and so far it has worked very well. It seems to be durable enough to handle the constant rolling and unrolling required if you have to set it up and take it down every day as I do.
It’s not quite as convenient as the Bluetooth connection with a mobile phone or tablet, but you also don’t have to worry about interference. It also frees your phone or tablet for other duties, such as taking video, measuring spin rates with a Bluetooth-enabled ball and app or playing music.
That said, I’m told the good folks at Pocket Radar are looking into the possibility of making it Bluetooth-enabled in the future. If it comes true, hopefully they will offer either a retrofit kit or a buyback option as they have with other products.
With everything in place, all that’s left is to turn it on using the red button on the side of the Smart Display, push the white button on the Smart Coach to wake it up and press and hold the Mode button on the Smart Coach to set it to continuous mode. That’s it – you’re all set to start capturing pitches.
Instant feedback
Each time the pitcher throws a pitch, the speed is shown on the digital display in big, bright red numbers. The numbers remain visible for a few seconds, then turn off. At that point you’re ready to capture the next pitch.
One of the best features of the Smart Display is that if the pitcher hits a new speed high, you can use the recall function to bring that number back so you can take a photo as I did here. While showing the numbers on the Smart Coach itself is nice, there’s nothing like showing them in big, bright numbers to give the pitcher an extra sense of pride.
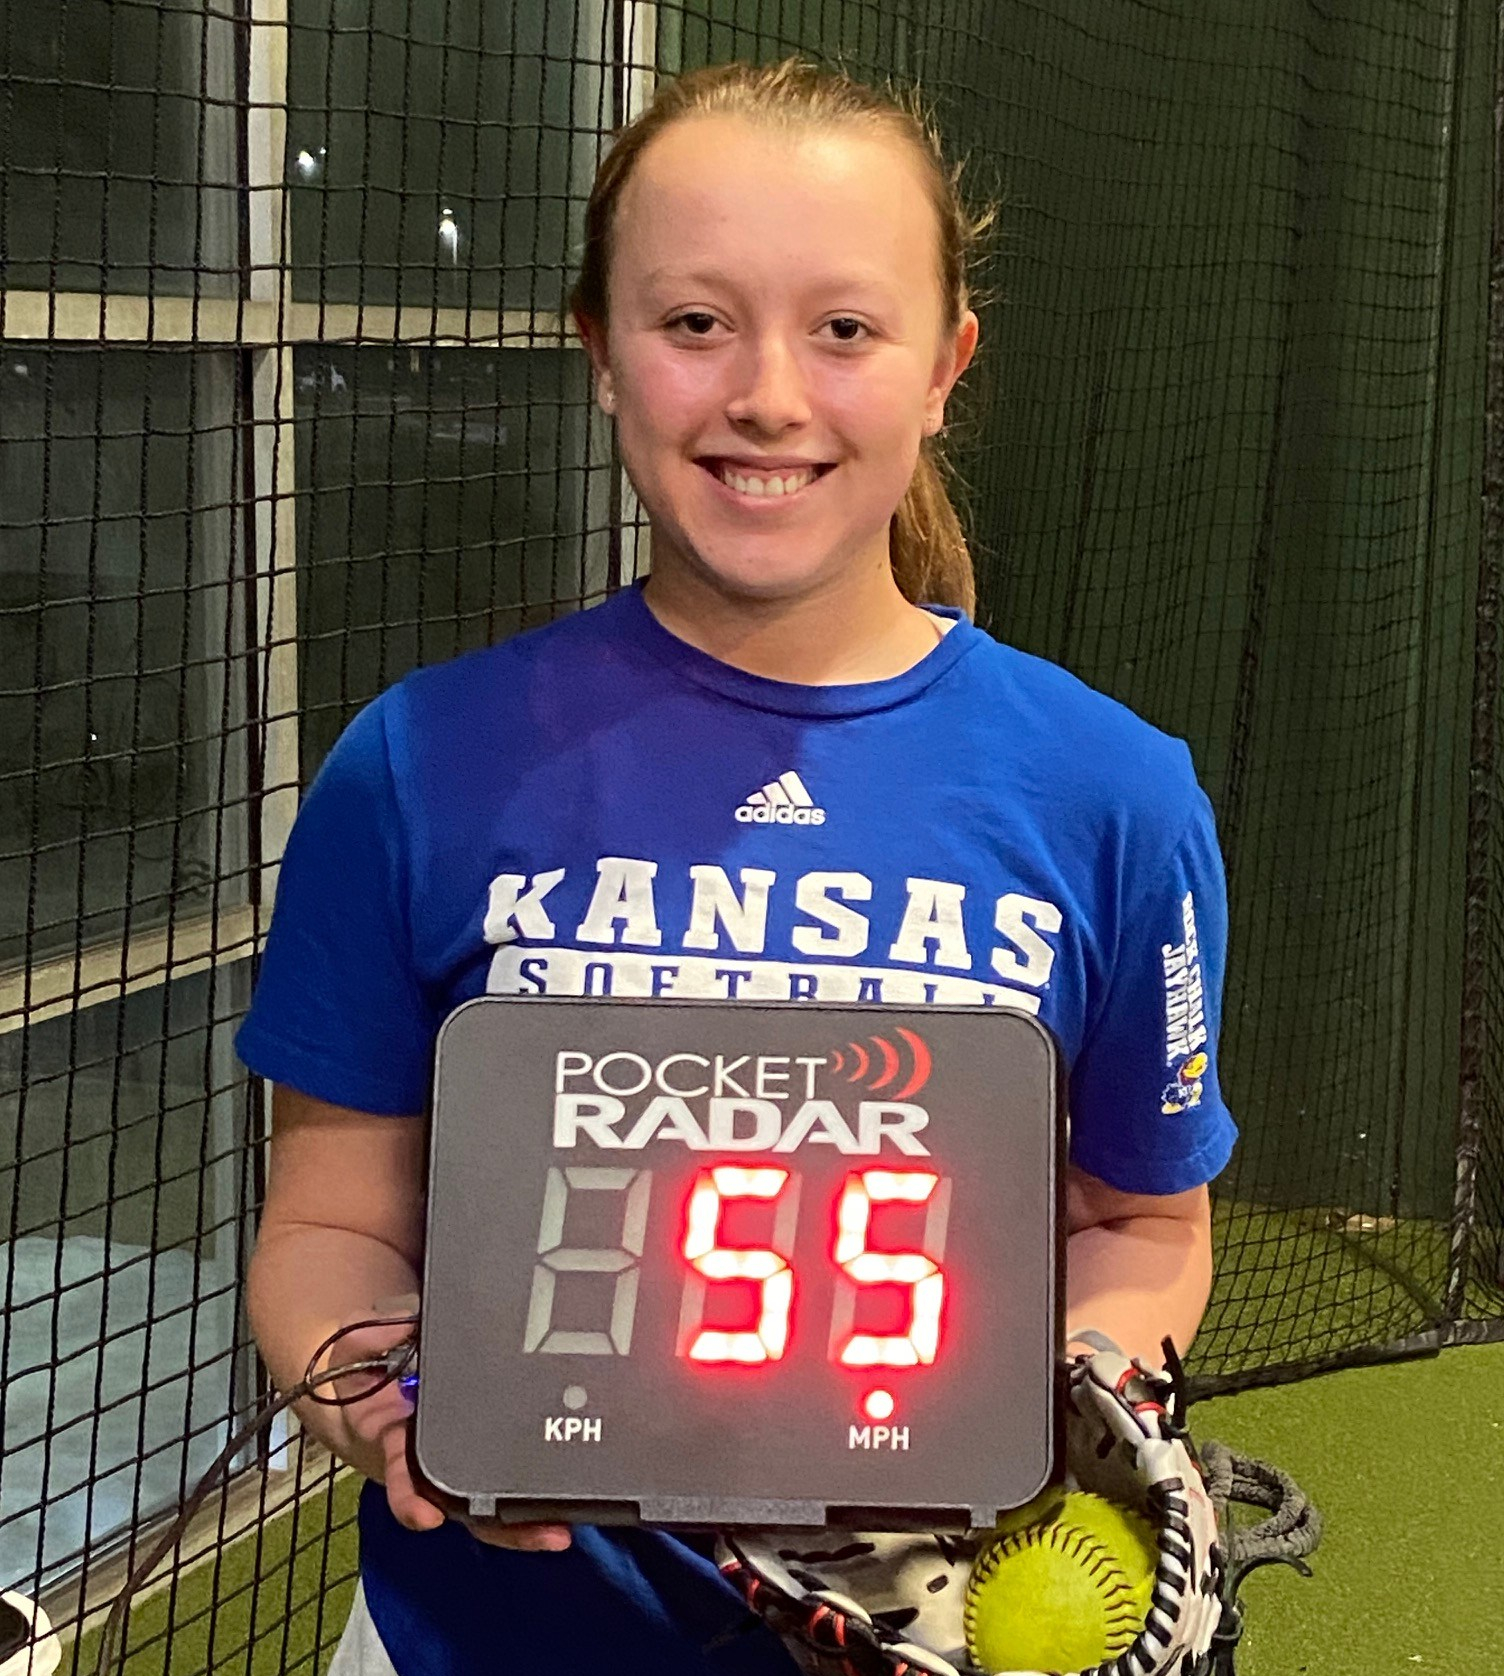
Nothing like the pride of accomplishment.
The display will hold for about a minute, I think, which should be ample time to get the photo. But if not, just go back and pull it up again.
Having this instant, continuous feedback, by the way, has had a positive effect on my students as I wrote in another blog post. Seeing where they are tends to make them push themselves to achieve higher speeds. Having the numbers in a big, bright display that anyone in the area can see adds a bit of accountability too. No one wants to be seen as slacking off or underachieving when others are watching.
Watch the (outside) nickle hardware
I will admit I was a bit concerned when I was first using the Smart Display because it seemed like it was prone to lose power and shut down any time I had a student pick it up to take a photo. What I discovered, however, that it wasn’t the Smart Display that was the problem.
It was actually the power connection cable from my power block to the unit. It apparently was cheap, and after not much use broke somewhere in the middle. If I set it just right it would work, but if I moved it even slightly it didn’t.
Once I started using a new cable the problem went away. I share that story so you don’t freak out if you have a similar issue. Check the nickle hardware first, especially the power block and cable you probably picked up for free at a trade show or as a gift for attending a presentation. You’ll save yourself a lot of embarrassment.
Cost
By now you’re probably wondering what all of this wonderfulness costs. It’s not cheap. The Smart Display retails for $499.99 on the Pocket Radar website, and a quick search showed that price holding across the Internet so it’s definitely not for the casual user.
(There was one exception, which showed the Pro Radar System and Smart Display for $69.99 but you probably want to steer clear of that. If it sounds too good to be true it probably is.)
There is also a bundle that includes the Smart Coach and Smart Display for $799.99. That might be worthwhile if you don’t own the Smart Coach yet. But if you already own the radar unit itself, you’re better off purchasing the Smart Display separately.
Final word
As you can probably tell, I really like the Pocket Radar Smart Display. I can keep it and all the accessories in my car, which means I don’t have to remember to charge and bring my iPad to every lesson – an issue I had a couple of times, which was disappointing for both myself and my students.
I also don’t have the risk of my iPad falling out of bag or “walking away” in a crowded facility if someone sees me tucking it away after lessons. It’s also a less attractive target to be stolen since it basically has one function and you need a Smart Coach to operate it.
More importantly, the bright display and the mounting options will be a definite plus when I am giving lessons outside. I wasn’t relishing the idea of setting my iPad down in the dirt. Now I won’t have to.
For facilities, pitching coaches, programs with multiple teams or even team coaches who are serious about measuring performance and holding players accountable, the Smart Display is a great addition to the Smart Coach. It’s also a smart investment in your players’ futures.
CORRECTION: I originally said you couldn’t use the Smart Display and the Smart Coach app at the same time, but I was incorrect about that. You can. When I tried it I forgot I had to re-pair the Smart Coach with my iPhone because it had previously been paired to my iPad. So you if you want to capture the history, or shoot a video with the embedded speed on it, or use the audible announcement of the speed, you CAN do that while running the Smart Display. This review has been updated to reflect the new (to me) information.