Blog Archives
IR Won’t Put Young Pitchers in the ER

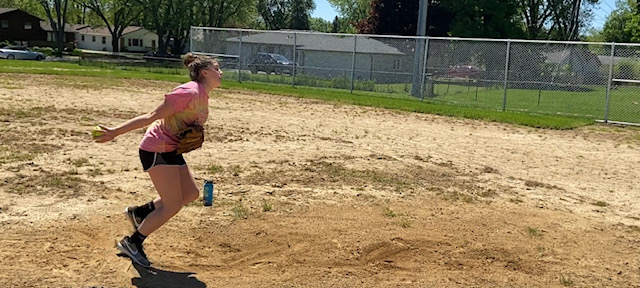
Let me start by declaring right in the beginning I am a huge advocate of the pitching mechanics known as “internal rotation” or IR. While it may also go by other names – “forearm fire” and “the whip” comes to mind – it essentially involves what happens on the back side of the circle.
With IR, the palm of the hand points toward the catcher or somewhat toward the third base line as it passes overhead at 12:00 (aka the “show it” position), the comes down with the elbow and upper arm leading through the circle. From 12:00 to 9:00 it may point to the sky or out toward the third base line. Then something interesting happens.
The bone in the upper arm (the humorous) rotates inward so the underside of the upper comes into contact with the ribs while the elbow remains bent and the hand stays pointed away from the body until you get into release, where it quickly turns inward (pronates). It is this action that helps create the whip that results in the high speeds high-level pitchers achieve.
This action, by the way, is opposite of so-called “hello elbow” or HE mechanics where the ball is pointed toward second at the top of the circle and is then pushed down the back side of the circle until the pitcher consciously snaps her wrist and then pulls her elbow up until it points to the catcher.
Note that I don’t call these styles, by the way, because they’re not. A “style” is something a pitcher does that is individual to them but not a material part of the pitch, like how they wind up. What “style” you use doesn’t matter a whole lot.
But mechanics are everything in the pitch, and the mechanics you use will have a huge impact on your results as well as your health.
IR is demonstrably superior to HE for producing high levels of speed. The easiest proof is to look at the mechanics of those who pitch 70+ mph. You won’t find an HE thrower in the bunch, although you’ll probably find a couple who THINK they throw that way, which is a sad story for another day.
It also makes biomechanical sense that IR would produce better speed results. Imagine push a peanut across a table versus putting into a rubber band and shooting it across the table. I know which one I’d rather be on the receiving end of.
So when trying to defend what they teach, some HE pitching instructors will respond by questioning how safe it is to put young arms into the various positions required by IR versus the single position required by HE. They have no evidence, mind you. They’re just going by “what they’ve heard” or what they think.
Here’s the reality: IR is so effective because it works with the body is designed to work rather than against it. Try these little body position experiments and see what happens.
Experiment #1 – Jumping Jacks Hand Position
Anyone who has ever been to gym class knows how to do a jumping jack. You start with your hands together and feet at your side, then jump up and spread your feet while bringing your hands overhead. If you’re still unsure, Mickey Mouse will demonstrate:

Look at what Mickey’s hands are doing. They’re not turning away from each other at the top, and they’re definitely not getting into a position where they would push a ball down the back side of the circle. They are rotated externally, then rotating back internally.
Experiment #2 – How You Stand
Now let’s take movement out of it. Stand in front of a mirror with your hands at your sides, hanging down loosely. What do you see?
If you are like 99% of the population, your upper arms are likely touching your ribs and your hands are touching your thighs. In other words, you’re exactly in the delivery position used for IR.

To take this idea further, raise your arms up about shoulder high, then let them fall. At shoulder height your the palms of your hands will either be facing straight out or slightly up unless you purposely TRY to put them into a different position.
When they fall, if you let them fall naturally, they will return to the inward (pronated) position. And if you don’t stiffen up, your upper arms will lead the lower arms down rather than the whole arm coming down at once.
What this means is that IR is the most natural movement your arm(s) can make as they drop from overhead to your sides. If you’re using your arms the way they move naturally how can that movement be dangerous? Or even stressful?
When they fall, you will also notice that your upper arms fall naturally to your ribcage and your forearms lightly bump up against your hips, accelerating the inward pronation of your hands. This is what brush contact is.
Brush contact is not a thwacking of the elbow or forearm into your side. If you’re getting bruised you’re doing it wrong.
Think of what you mean by saying your brushed against someone versus you ran into them. Brushing against them implies you touched lightly and slightly altered your path. Bumping into them means you significantly altered your path, or even stopped.
The brush not only helps accelerate the inward turn. It also gives you a specific point your body can use to help you release the ball more consistently – which results in more accurate pitching. It’s a two-fer that helps you become a more successful pitcher.
Experiment #3 – Swing Your Glove Arm Around
If you use your pitching arm you may fall prey to habits if you’ve been taught HE. So try swinging your glove arm around fast and loose and see what it does.
I’ll bet it looks a lot like the IR movement described above. That’s what your throwing arm would be doing if it hadn’t been trained out of you.
And what it actually may be doing when you throw a pitch. You just don’t know it.
Reality check
The more you look at the biomechanics of the IR versus HE, the more you can see how IR uses the body’s natural motions while HE superimposes alternate movements on it. If anything, this means there’s more likelihood of HE hurting a young pitcher than IR.
The forced nature of HE is most likely to show up in the shoulder or back. Usually when pitchers have a complaint with pain in their trapezius muscle or down closer to their shoulder blades, it’s because they’re not getting much energy generated through the HE mechanics and so try to recruit the shoulders unnaturally to make up for it. That forced movement places a lot of stress on it.
They may also find that their elbows start to get sore if they are really committed to pulling the hand up and pointing the elbow after release, although in my experience that is more rare. Usually elbow issues result from overuse, which can happen no matter what type of mechanics you use.
The bottom line is that if the health and safety of young (or older for that matter) pitchers is important to you, don’t get fooled by “I’ve heard” or “Everybody knows” statements. Make a point of checking to see which way of pitching works to take advantage of the body’s natural movements, which will minimize the stress while maximizing the results.
I think you’ll find yourself saying goodbye to the hello elbow.
Cue to Help Fastpitch Pitchers Gain an Explosive Release

One of the most common issues among fastpitch pitchers is a tendency to try to add speed to a pitch by forcing it out with a lot of forward effort. You see them get ready to deliver the ball, and suddenly instead of whipping it from back to front and letting go they hang onto the ball and try to purposefully push it out of their throwing hand.
This motion is often accompanied by pushing the throwing side shoulder forward as well. While the intention is to make the pitch faster, it actually ends up having the opposite effect.
In other words, while it may feel strong, it isn’t very effective, biomechanically speaking.
I was facing that very dilemma with a younger student this week, so I came up with a new way to explain what she should do. I’ve since tried it with several with great success (so far).

The way I explained it was in the arm circle there is a point where you have developed all the speed you can get. That point is essentially at the bottom – six o’clock on an analog clock if you’re using the clock face as a visualization device.
Anything that happens after that not only doesn’t contribute to more speed, it actually starts taking away speed. So, since there’s nothing to be gained but much to be lost you might as well just let go right at the bottom, which will be roughly around the back leg.
Putting it this way seems to make sense, probably because it addresses the main reason the pitcher started pushing in the first place – to gain speed. Explaining it hurts their speed instead seems to break through the clutter of ingrained patterns and helps them find their release point.
For the pitchers where I had a radar set up, which was almost all of them, getting the ball out at the right point resulted in an immediate speed increase of 2-3 mph with no additional effort on their part. In fact, for most of them we were just working a drill where they weren’t trying to go all-out, just standing at a 45-degree angle and taking an easy step or medium-speed push.
What was really interesting about it was speed wasn’t the only aspect of their pitches to benefit. Suddenly balls that had been flying all over the place were going straight and low in the strike zone, even though we weren’t focused on accuracy at all.
I did point out the accuracy to the pitchers after a while, however, to give them one more reason not to force the ball forward. Just let it go at the right time, in the right place, and accuracy takes care of itself.
For some pitchers you may need to show them exactly where the ball needs to come out by having them get into their release position, bring the ball from 7:00 to 6:00, and then show them where it should be coming off their thumbs and their fingertips. I did this with one pitcher in particular last night and she immediately improved her speed and accuracy. She thanked me for it, because she said she now understood exactly what she needed to do.
So if you have a pitcher who is struggling to whip and release the ball, and is instead trying to force or push it forward before letting go, give this cue a try. It could be an instant difference-maker.
The Hips Are the Key to Body Movement
Here’s a quick experiment for you to try at home (or wherever you’re reading this blog). Try to move your arm away from the rest of your body. Pretty easy, right?
Now try a leg. Either one will do. Again, pretty easy.
Now do your head. If you go forward you can get it out there pretty far, and even side-to-side or backwards will work if you’re more flexible than I am.
Ok, here comes the key part: try moving your hips away. Aha! You can maybe get them out a couple of inches but that’s about it.
So basically, if your hips move away the rest of the body has to go with it.
This is a key concept for any fastpitch softball player to understand, but especially for pitchers. Many pitchers, when they are trying to get leg drive, will just run their stride leg past their drive leg and kick it forward. The result is that the stride leg pulls them off the pitching rubber – which is like trying to drag a wagon full of concrete behind you.
That’s because a lot of your weight (some of us more than others) and strength is carried in the hip area, which includes the lower torso. If it is stationary (more or less) it’s going to take a lot of effort to get it in motion so it can contribute to the pitch.
If the hips are already moving smartly forward as the pitcher drives out, however, instead of holding her back they add to the power. The difference (or delta as they like to say in the business world) can be huge.
The challenge is when pitchers think about moving forward, they tend to focus on their stride leg and where it lands. This leads to them doing more of a kicking motion instead of focusing their attention on where it should be – on the hips.
One way to help them get the feel of moving the hips forward (and how much effort it takes) is to have them do a standing broad jump. That is all about getting the hips and torso to fly forward.
Another way is to have them stand on one leg and then hop a short distance to the other. this can be front-to-back or side-to-side.
I say a short distance because as soon as you say long distance they’re going to go right back to reach out with the leg/foot instead of moving the middle.
A harness around their hips tied to a bungy cord or surgical tube will give them that feeling. Have them put the connector in the front, stretch the tube out as much as they can, then go through their pitching motion, letting the tube pull them forward.
You can also get behind them, place your hand on their lower back and give them a small push as they get read to go out. Just be careful that it’s a small push. You don’t want to push a pitcher who’s having trouble moving down to the ground (as I once did).
Ultimately, though, the best thing to do is get them to figure out how to get their hips moving forward to become part of the drive without all the artificial helpers.
As they start to get the feel of moving the hips properly, have them start pitching from a short distance into a net or screen. Keep them there until they can do it without thinking. then slowly move them back a few feet at a time and ensure they can maintain that hip-centered approach.
Only move to the next distance when they appear to have mastered the previous one. If they go back to being leg-oriented when they move back, move up to the previous position again. Repeat until they can throw properly at a full distance.
Incidentally, what I have found is that this is very easy and natural for some and very difficult and alien for others. I have no idea why, because it comes naturally to me.
What I do know, however, is that it is essential to maximize speed. The more momentum you can crash into a firm front leg the more the arm whip will be accelerated, creating more energy to transfer into the ball. A pitcher who is being held back by her hips will struggle to attain her very best speed.
The best way to check this is using video, either on a dedicated camera or your phone set to a high speed (60 frames per second or more). The naked eye can be easily fooled, especially if the pitcher is doing whatever she does quickly.
But with video, you can see if the hips are passing quickly over the pitching rubber on their way forward or whether they hover over it as the arms and legs move forward. (The first one is correct.)
Once you can see what’s going on you can work to correct it. It probably won’t be easy, but the results will be worth it.