Kodak Playsport an excellent teaching tool for fastpitch players
I’ve talked before about the value of video as a teaching tool for fastpitch players. Diffe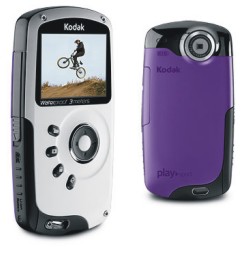 rent people learn differently — some are best at reading information, some are best at hearing instructions, and some are visual learners. Actually, in my experience most can comprehend what they’re doing (versus what they think they’re doing) best when they see it.
The problem is video can be difficult to work with. Setting up a camera to a computer to provide analysis takes a while, and often limits you as far as what you can show. I know personally it’s a pain to have to drag a table with a computer and a camera on a tripod around to various angles. True, you can use the camera’s display screen without a computer, but it doesn’t lend itself very well to stepping back and forth through the video or showing specific points in the movement.
That’s why I’ve been waiting so excitedly for the Kodak Playsport personal video camera to come out. And after using it this weekend that excitement was definitely justified. But before I get into specifics, here’s a little background.
I first came across news about the Playsport when I was on the Discuss Fastpitch Forum site. One poster had talked about using the Kodak Zi8 personal video camera. What attracted me was the idea of shooting 60 frames per second (fps) video. That was a capability I’ve always wanted but never had. So I was getting ready to buy it when I saw someone else post something about the Playsport, which would do what the Zi8 did, but came in a more rugged package and would cost $30 – $50 less. I dialed down my impatience and elected to wait for that camera. I’m glad I did.
The Kodak Playsport is ideal for doing spot checks during lessons or grabbing a quick video of a game swing. Usually during lessons I use my cell phone’s ability to shoot video, but it is really tough to get the video to stop at a certain point. The Playsport, which is actually the size of a smallish cell phone, solves that. You can set it up to shoot 720p HD video at 60fps, which gives you plenty of stopping points along the way to show exactly what you want — such as a pitcher releasing a changeup a little too early or a hitter dropping her hands before swinging.
What really makes it a great teaching tool, though, is you can get to that point by stepping through the frames one at a time. You can go back and forth so you can get to the exact point you want, and rapidly step through to simulate slow motion. The LCD screen is a little small — only 2 inches square — but it’s good enough to see what you need to see. I used it Friday night to show a pitcher that her release on the changeup was a little early, and she was able to see the blur of the ball. More importantly, it helped her make an immediate correction.
The basic operation is simple. Turn it on — it comes up immediately — point it at the subject, hit the large center button to start and stop the recording. A 4X digital zoom lets you move in somewhat closer if needed, although if you’re used to the 20X zoom of regular video cameras it won’t seem like all that much.
When you want to watch the playback, you hit one of four buttons arrayed around the edge of the center wheel and it switches to playback mode. You can then play the current video or scroll through to find the one you want using the four-way wheel on the outside of the center button. If you want to step through a video, hit the play button, then hit it again to pause, then use the left and right arrows to step through frame by frame, forward or backward.
If you want to watch the video in a larger format, you can hook it up to your computer through the supplied USB connector, or to an HD TV using the supplied HDMI cable. I did download the video to my computer, though, and it looks great. The only caveat is that it records in QuickTime’s .mov format, so if you use video analysis software that requires .avi format you won’t be able to use it with that. But the free QuickTime player will be find to step back and forth through the video. You just can’t draw on it or use other analysis tools. The included software also makes it easy to upload your video to Facebook, YouTube and MySpace.
One of the other things that attracted me to the Playsport, as I mentioned, was the ruggedness. It is designed to be used during activities. One of the big selling points is that it is waterproof down to 10 feet. Now, I don’t anticipate taking it under water. But if I have it in my bag and it starts to rain, it’s nice to know I don’t have to worry about whether it will get damaged. I’ve also read in other reviews that people have tried dropping it and it still worked fine. I don’t plan on trying that since I purchased mine out of my own money and would hate to find out it didn’t work, but it sounds like it ought to hold up to the softball environment. Just to be safe, though, I also purchased the two-year product replacement plan at Best Buy.
Again, as a teaching tool the Playsport seems ideal. You can easily slip it in your pocket, and pull it out as needed. If you’re outdoors on a sunny day, you can change the display to use a glare shield. I used it for both hitting and pitching this weekend, and it was effective in helping those players see what they were doing and make quick corrections. And now here’s the really good news: all of this capability comes for just $149.
If you’re looking for a great little pocket video camera that can help you make a difference with your players, check out the Kodak Playsport. It packs a lot of capability for the money.
Posted on April 5, 2010, in Product Reviews. Bookmark the permalink. 3 Comments.


Rather than make an already-long post even longer, I thought I’d add an addendum here regarding file formats. In the post I mentioned that the format the Playsport uses is .MOV, which is not compatible with some video analysis software. I did confirm a work-around last night, however. If you have a “prosumer” video editing application you can import the file into it and convert it to the format you need. In my case, I use MotionView to do video analysis, which means I need a .AVI file. I was able to pull the raw footage into Pinnacle Studio 14 and convert it into an .AVI file very easily. While it is an extra step, there is also an advantage. You can use the video editing software to trim the file so you just have what you need. That will come in handy if you’re shooting, say, a batter hitting off of live pitching and it takes three or four pitches to get a good swing. You can cut out the bad pitches and just use the good one.
LikeLike
Just to add futher info…there are many free video converter softwares available on the web. Since most “Flip” cameras save as .mov, investing in free or almost free software is very valuable. Thanks for your input..I enjoy your blog very much!
LikeLike
Thanks, Melissa. Glad you like it. Can you point out a couple of the video conversion software applications? I’m sure others would be interested, especially if they will convert a file to .avi so it can be used with video analysis software. Thanks.
LikeLike